

Mini Cheeseburgers How to Make Easy Sliders
There’s something about the scent of baking chocolate mingling with fresh zucchini that instantly transports me back to grandma’s kitchen—where she’d always have a loaf or two cooling on the rack, promising that it’s “healthy enough to eat for breakfast.” I vividly remember sneaking a slice before dinner, because honestly, how could I resist? Over the years, I’ve tested countless versions of this chocolate zucchini cake, and I swear—it’s become a family favorite not just because it tastes like a decadent treat, but because it’s so easy to throw together. This one’s a lifesaver on busy nights when I want something sweet but don’t want to spend hours baking. Plus, I love how sneaky it is—my kids ask for this all the time, not realizing it’s packed with all that sneaky veggie goodness. Trust me on this one: once you try it, it’ll become your new go-to for all things cozy, chocolatey, and just a tiny bit healthified. Let’s get baking!
What is a Zucchini Bundt Cake?
Think of this as the lovechild of moist, fudgy brownies and a classic veggie muffin—oh yes, zucchini! It’s essentially a rich, chocolatey cake that’s so tender and flavorful, you’d never guess there’s a secret ingredient hiding inside. The name “chocolate zucchini bundt cake” might sound fancy, but really, it’s just a wonderfully simple dessert that combines a handful of pantry staples with this sneaky vegetable. The zucchini keeps it insanely moist, almost like a brownie on steroids, but without the heaviness. Plus, the bundt shape adds that gorgeous, bakery-style touch, making it perfect for sharing (or hiding at the back of the fridge). I love that this cake isn’t overly sweet, so it feels like a treat but still somehow feels a little good for you. It’s the kind of recipe that’s perfect for when you want something indulgent but don’t want to sacrifice all your instincts of eating healthy—kind of like the best of both worlds.
Why you’ll love this recipe?
What I love most about this chocolate zucchini bundt cake is how it makes me feel—comforted, satisfied, and a little impressed that vegetables can be so sneaky in desserts. The flavor is just… wow. Deep, chocolaty goodness with a hint of earthiness from the zucchini, which adds an unexpected layer of richness without overpowering the sweetness. It’s really ‘adult’ enough for grown-up cravings, but kids go wild for it too. Plus, it’s such a versatile baking project—I’ve made this with almond flour for a nutty twist, and it still turns out fluffy and moist. The best part? It’s ridiculously simple. I always do this when I need a quick dessert; no complicated icing or fancy decorating, just good old baking magic. Budget-wise, it’s super friendly, using ingredients I usually have lying around—cocoa powder, flour, sugar, and a couple of eggs. It also works beautifully for different occasions: brunch, potlucks, or just a treat for yourself after a long day. Honestly, what I love most about this is that it’s like baking a little love note, warm and inviting—everyone who bites into it is smitten. I promise, once you make it, it’ll disappear in minutes at my house!
How do I make a Zucchini Bundt Cake?
Quick Overview
This cake comes together so fast! It starts with grating the zucchini (don’t forget to squeeze out the excess moisture or your cake might turn out a little dense), then mixing the dry ingredients in one bowl. The wet ingredients—oil, eggs, vanilla—are whisked until smooth, then folded into the dry. The grated zucchini gets added last, ensuring every bite is moist. I typically pour the batter into a greased bundt pan and swirl in some dark chocolate chips for little pockets of melty goodness. Baking at 350°F (175°C) for about 50-55 minutes usually does the trick, but I always keep an eye on it. You’re looking for a toothpick inserted in the center to come out with just a few moist crumbs. Once out of the oven, I let it cool for at least 20 minutes—patience is key here—before turning it out onto a cooling rack. When it’s cool enough, I drizzle on a simple glaze or dust it with powdered sugar, and voilà: you’ve got a show-stopping dessert that tastes even better than it looks!
Ingredients
For the Main Batter:
– 2 cups grated zucchini (about 2 medium zucchinis)
– 1 3/4 cups all-purpose flour (or almond flour for a different vibe)
– 3/4 cups unsweetened cocoa powder (trust me, the good stuff makes all the difference)
– 1 1/2 teaspoons baking soda
– 1/2 teaspoon baking powder
– 1/2 teaspoon salt
– 1 cup sugar (can use coconut sugar for a slightly healthier twist)
– 1/2 cup vegetable oil (or melted coconut oil)
– 3 large eggs
– 2 teaspoons vanilla extract
For the Filling:
– 1/2 cup mini chocolate chips (optional but highly recommended for melty pockets)
– 1/4 cup chopped nuts (walnuts or pecans — totally optional but adds nice texture)
For the Glaze:
– 1 cup powdered sugar
– 2-3 tablespoons milk (or plant-based milk)
– 1 teaspoon vanilla
– Extra cocoa powder or melted chocolate for richness (optional)
Step-by-Step Instructions
Step 1: Preheat & Prep Pan
I always start by preheating my oven to 350°F (175°C). Grease your bundt pan really well—trust me, nothing’s worse than wrestling a cooled cake out of a sticky pan. I use butter and dust it lightly with flour, making sure every nook and cranny is coated. Sometimes I even spray it with a non-stick baking spray with flour—it’s a game changer! Set the pan aside while you gather your ingredients. As for the zucchini, give it a good rinse, then grate it using the fine side of your box grater. No need to peel—just a quick rinse and dry, then squeeze out as much moisture as possible with a clean kitchen towel or paper towel. I learned the hard way that excess water can make the batter too runny and affect the texture, so don’t skip this step.
Step 2: Mix Dry Ingredients
In a big bowl, whisk together the flour, cocoa powder, baking soda, baking powder, and salt. This ensures everything gets evenly distributed, which helps your cake rise beautifully and rise evenly. You want the mixture to look uniformly dark and fluffy—kind of like a rich chocolate cloud. I like to sift my cocoa, especially if it’s a bit lumpy, so the batter isn’t streaked with cocoa clumps.
Step 3: Mix Wet Ingredients
In a separate bowl, whisk the sugar, oil, eggs, and vanilla until smooth. The mixture should turn a little pale and have a shiny sheen. I usually do this by hand—trust me, it’s cathartic—and I love watching the consistency become silky. If I’m feeling extra indulgent, I test the temperature of the eggs first; if they’re a bit cold, I warm them slightly in a bowl of warm water. This makes mixing easier and helps everything combine better.
Step 4: Combine
Pour the wet mixture into the dry ingredients and fold gently—don’t overmix here! Overmixing can make the cake dense instead of tender. Just stir until you see no more flour streaks. It’s okay if there are some small lumps; that’s what keeps it moist. When your batter is almost ready, fold in the grated zucchini and chocolate chips if you’re using them. These little bits of goodness will melt slightly in the oven, creating pockets of decadence.
Step 5: Prepare Filling
If you’re adding nuts or extra chocolate chips, fold them in now. For a fun swirl, I often save a few spoonfuls of batter to layer into the pan, then add a spoonful of plain batter on top and swirl gently with a skewer or butter knife. That creates gorgeous marbling in the finished cake—it looks beautiful and makes every slice special.
Step 6: Layer & Swirl
Pour the batter into your prepared bundt pan. If you want a marbled look, layer spoonfuls of plain and chocolate batter, then swirl with a skewer or toothpick. This will give a lovely pattern in the finished cake that looks just as charming as it tastes. Be gentle—this isn’t a race. Tap the pan a few times on the counter to smooth out the batter and release any air bubbles.
Step 7: Bake
Pop it in the oven and bake for 50-55 minutes. Keep an eye on the clock—every oven is different, and overbaking can dry out this moist cake. Check doneness with a toothpick—insert it into the center and see if it comes out with just a few moist crumbs. If it’s still wet, give it a bit more time, but don’t overdo it! I find that starting to smell incredibly chocolatey and having a slight pull in the middle are good signs it’s ready.
Step 8: Cool & Glaze
Let it cool in the pan for about 20 minutes, then carefully invert it onto a wire rack. Patience here is key—rushing this step can cause cracks. Once cooled, mix powdered sugar, milk, and vanilla until smooth, then drizzle over the cake. For a richer finish, I sometimes melt a handful of chocolate and drizzle it instead. The glaze should be slightly thick but still pourable; if it’s too runny, chill it a bit, and if it’s too thick, add a splash more milk. The smell alone will have everyone lining up for a slice.
Step 9: Slice & Serve
Once the glaze sets (give it at least 15 minutes), slice into thick pieces. I like to use a serrated bread knife for clean, neat slices. Serve it warm with a dollop of whipped cream or a scoop of vanilla ice cream—your call. This cake is equally divine on its own. I often hide a slice for later, but honestly, it rarely lasts long around my house. As it cools completely, it gets even fudgier—perfect for those rainy afternoons or cozy evenings curled up with a book.
What to Serve It With
This cake is versatile enough to shine at breakfast alongside a steaming mug of coffee—think of it as a grown-up muffin, but way more indulgent. I’ve also served it as a fancy dessert with a scoop of vanilla ice cream and a drizzle of caramel—instant win after Sunday dinners. For brunch, pairing it with a simple fruit salad or some Greek yogurt feels just right. It’s also such a hit as an afternoon snack with a cup of tea—my kids actually ask for seconds, and I always tell them it’s “naughty but nice.” Whenever I bring it to a potluck, it disappears in minutes. The richness balances beautifully with fresh berries or whipped cream, so don’t hesitate to add your favorite toppings or a sprinkle of powdered sugar for that extra special touch. I love making a double batch—because honestly, I’ll be craving this again tomorrow! It’s comfort food that feels fancy enough for guests but simple enough to make any day of the week.
Top Tips for Perfecting Your Chocolate Zucchini Bundt Cake
Every time I bake this, I learn a little more about what makes it perfect. For example, I used to skip the squeezing step on the zucchini, and the batter was too watery—trust me, those extra few minutes to drain it make a huge difference. When mixing the wet ingredients, I’ve found that using room temperature eggs helps everything blend more smoothly, giving a lighter crumb. If you’re feeling adventurous, swapping half the sugar for honey or maple syrup adds a lovely depth of flavor—just cut back on the liquid a little. As for the swirl technique, don’t be shy—layer your batters and swirl as much or as little as you like; it’s your cake! Overmixing is my biggest mistake—I used to vigorously stir, and I’d end up with a dense, rubbery crumb. Instead, I fold gently; this keeps the cake tender and fluffy. And a tip I swear by: check your cake at 50 minutes, then go from there. Everyone’s oven is different, and you want that perfect moistness without drying it out. On the glaze, I often add a teaspoon of espresso powder or cinnamon to complement the chocolate, but honestly, even a simple vanilla glaze is divine. Each time I tweak and personalize this recipe, I fall a little more in love with it. It’s forgiving, friendly, and just oh-so-satisfying to make and share.
Storing and Reheating Tips
This cake is even better the next day—if it lasts that long! Keep it covered at room temperature for 2-3 days in an airtight container, which helps retain moisture and keeps it fresh. I usually cover it with a clean kitchen towel or a cake dome to prevent drying out. If I need to keep it longer, I pop it into the refrigerator—just be sure to wrap it tightly with plastic wrap or pop it into a cake box to prevent it from absorbing other fridge smells. It’ll stay fresh for up to a week that way. For longer storage, the freezer is your friend: tightly wrap individual slices or the whole cake in plastic wrap, then aluminum foil, and freeze for up to 3 months. Thaw at room temperature or in the fridge overnight. I recommend adding the glaze just before serving—if you freeze it, wait until it’s fully thawed, then give it a quick glaze or dust with powdered sugar. Honestly, this cake warms up beautifully in the microwave for a quick snack—just 10 seconds or so—and it’s just as good as fresh out of the oven. Trust me, it’s a comfort just to have a slice waiting in the fridge for those moments when you need a little chocolate hug.
Frequently Asked Questions
Final Thoughts
There’s something so satisfying about transforming simple ingredients into something that feels indulgent but secretly nutritious—at least, that’s how I justify this cake at my house! It’s become my go-to when I want a comforting, satisfying dessert without guilt. The next time you’re craving chocolate and you’ve got zucchini sitting in the fridge, give this recipe a try. It’s forgiving, fuss-free, and always a hit with everyone I share it with. Plus, once you master the swirl technique and perfect the glaze, you’ll feel like a pastry chef in your own kitchen. I love how versatile this cake is—you can switch out ingredients, decorate it fancy or keep it simple, and it always turns out wonderful. Happy baking! I can’t wait to hear how yours turns out—don’t forget to leave a comment or share your variations. Now, go grab those zucchinis and whip up some magic!
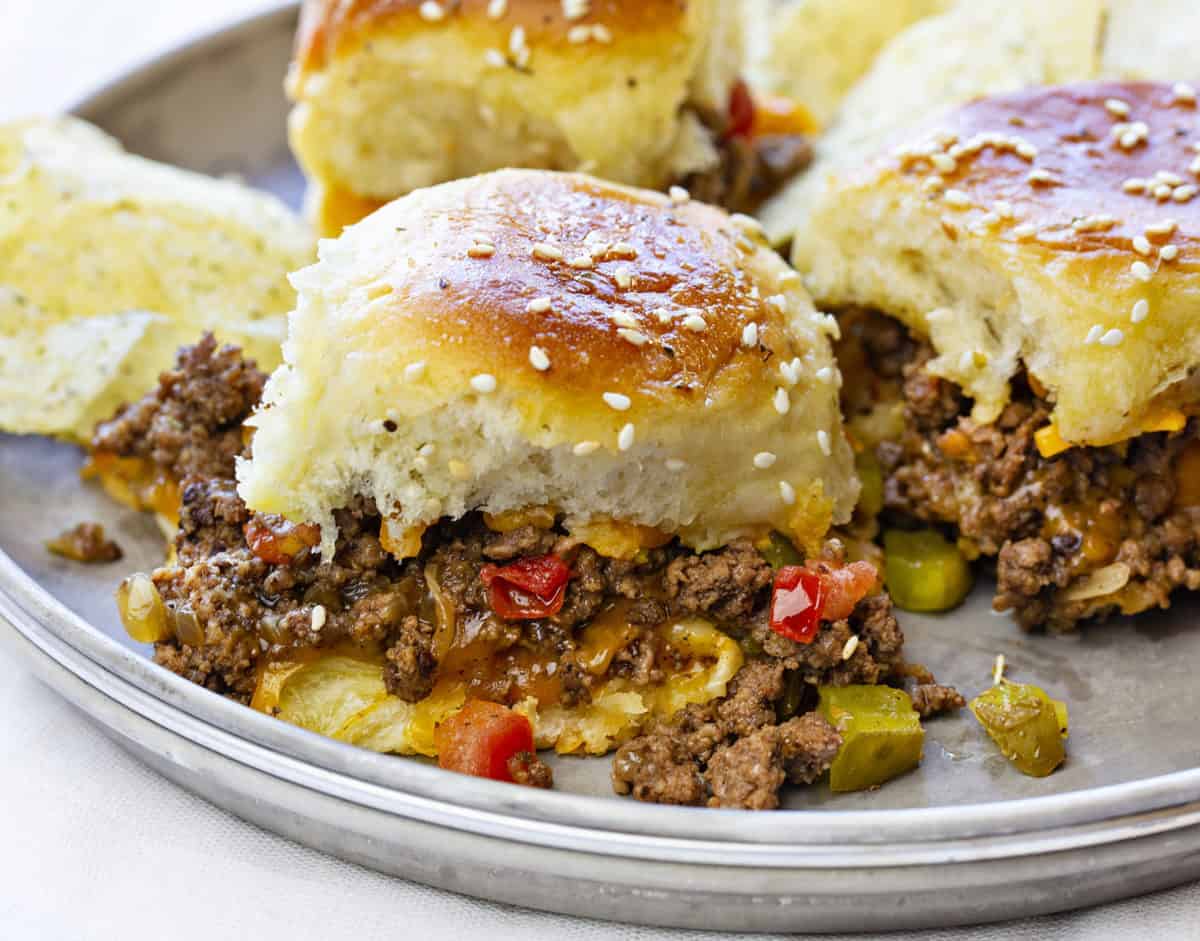
cheeseburger sliders
Ingredients
Method
- Preheat oven to 350°F.
- In a small bowl, mix seasoned salt, hamburger seasoning, salt, and pepper.
- Add oil to a non-stick pan, cook onions and garlic for 1-2 minutes, then add ground beef and Worcestershire sauce, season with mixture.
- Cook until no pink remains, about 8-10 minutes. Remove from heat.
- Mix melted butter, salt, pepper, and sesame seeds, set aside.
- Split rolls, place bottom half in a baking dish, top with cheese slices and beef mixture.
- Top with diced pickles, tomatoes, shredded cheese, and the top half of rolls.
- Brush generously with seasoned butter, cover with foil, bake for 15 minutes.
- Remove foil, bake for an additional 5 minutes until tops are golden brown.
- Remove from oven, slice, and serve hot.


Love these mini cheeseburgers—they’re perfect for any gathering! Quick, easy, and always a crowd favorite.
These mini cheeseburgers look absolutely delicious! I love how easy and fun they are to make—perfect for a quick snack or party.
These mini cheeseburgers look absolutely delicious! The combination of flavors is perfect.