
Simple Greek Chicken Bowls for Meal Prep
There’s something about a warm slice of coffee cake that just feels like a hug in food form, especially when it’s packed with zucchini and a hint of coconut. I remember the first time I ever made this—it was on a busy Sunday morning, and I’d promised my kids a treat, but I also wanted something wholesome. I’d seen a bunch of recipes with zucchini and figured, why not combine them into a fuss-free cake? The smell alone had everyone rushing to the kitchen—sweet, hint of coconut, and just a hint of comforting cinnamon. My kids ask for this all the time now, especially when they want a sweet snack that’s actually good for them. Honestly, this one’s a lifesaver on busy nights or those cozy weekends when you want something homemade but don’t want to slave in the kitchen. Plus, it’s so forgiving—I’ve tested it with almond milk, and it makes it even creamier. Trust me on this one, you’ll want this recipe in your back pocket forever.
What is Zucchini Coconut Coffee Cake?
This delightful treat is basically a cross between your favorite breakfast bread and a classic coffee cake, but with a little twist—zucchini and coconut! Think of it as a healthy-ish cake that sneaks in veggies without losing its sweet charm. The name might sound fancy, but it’s honestly just a cozy, moist cake that’s perfect for brunch, teatime, or whenever you need a quick pick-me-up. It’s essentially a spongy, tender crumb with bits of zucchini that keep it moist and lots of toasted coconut on top that gives every bite a subtle crunch. I love that it’s versatile—moist, flavorful, a little sweet, and with a texture that’s just right. The best part? It’s super easy to throw together with ingredients I usually have on hand. This cake is like those old family recipes you grew up loving—simple, honest, and made with love.
Why you’ll love this recipe?
What I love most about this zucchini coconut coffee cake is how it’s got that cozy, homey vibe but still feels special enough for guests. The flavor profile is just divine: the sweetness of coconut, the warmth of cinnamon, and that gentle vegetable undertone from the zucchini—kind of like a little secret in every bite. And it’s surprisingly simple to make. Once you shred the zucchini, the batter comes together in minutes, and the rest is just baking—no fancy equipment needed. I also love how budget-friendly this is; you probably already have everything in your pantry. Plus, it’s versatile—slice it for breakfast with a bit of butter, serve it as an afternoon snack with tea, or enjoy it as a dessert topped with a dollop of whipped cream. It’s moist, flavorful, and forgiving enough that I’ve tested numerous substitutions without losing its charm. This cake is a real winner in my book, and I think it’ll become yours too.
How do I make Zucchini Coconut Coffee Cake?
Quick Overview
This cake gets whipped up quickly and relies on simple pantry ingredients. Start by shredding the zucchini, then mix dry ingredients while melting butter or coconut oil. Whisk together eggs, milk, and vanilla, then combine everything into a smooth batter. Spread half the batter in your baking pan, add a cinnamon-spiced zucchini filling, then layer the rest of the batter on top. Sprinkle toasted coconut over the surface and bake until golden. It’s honestly one of the easiest, most forgiving recipes I’ve ever made—perfect for when you want something homemade but don’t want to fuss too much.
Ingredients
For the Main Batter:
- 1¾ cups all-purpose flour (or gluten-free flour blend, if needed)
- 1 cup granulated sugar (or coconut sugar for a richer flavor)
- 1 teaspoon baking powder
- ½ teaspoon baking soda
- ½ teaspoon salt
- 1 teaspoon cinnamon (or pumpkin spice if you like)
- ½ cup melted coconut oil or butter
- 2 large eggs
- ¾ cup milk (dairy or plant-based like almond or coconut milk)
- 1 teaspoon vanilla extract
For the Filling:
- 1 medium zucchini, shredded and drained (see tips below)
- 2 tablespoons brown sugar
- 1 teaspoon cinnamon
For the Glaze:
- ½ cup powdered sugar
- 1-2 tablespoons milk or lemon juice (to adjust consistency)
- ½ teaspoon vanilla (optional)
Step-by-Step Instructions
Step 1: Preheat & Prep Pan
Set your oven to 350°F (175°C) and grease a 9-inch round or square baking dish. I like using parchment paper, too—it makes removing the cake easier and keeps the edges neat. Make sure your rack is in the middle—baking too high or low can affect evenness. While it’s heating, shred that zucchini, and I always do this right after washing—it’s quick and easy.
Step 2: Mix Dry Ingredients
In a large bowl, whisk together the flour, sugar, baking powder, baking soda, salt, and cinnamon. I double check that everything’s well combined because even small clumps can throw off the batter’s rise. This step is simple but important for fluffy results.
Step 3: Mix Wet Ingredients
In a separate bowl, whisk the eggs, milk, vanilla, and melted coconut oil until smooth. Sometimes I warm the coconut oil just a bit so it’s easier to blend—trust me, it mixes better. I’ve tested this recipe with almond milk and it turned out even creamier, so feel free to experiment!
Step 4: Combine
Pour the wet into the dry and gently fold it together. Don’t overmix! A few lumps are okay—overmixing can make the cake dense. The batter should be smooth but not runny. You’ll notice it coming together quickly, and the smell of cinnamon is already making the kitchen smell irresistible.
Step 5: Prepare Filling
Grate the zucchini, then squeeze out excess moisture with a clean towel or cheesecloth—you want it moist but not watery. Toss with brown sugar and cinnamon until coated—this gives the cake a lovely, lightly spicy sweetness that balances the coconut.
Step 6: Layer & Swirl
Spread half the batter in your prepared pan. Drop spoonfuls of zucchini filling on top, then gently swirl with a knife or skewer—don’t overdo it, a gentle swirl creates that beautiful marbled look. Top with the remaining batter, spreading it as evenly as possible.
Step 7: Bake
Pop it in the oven and bake for 35-40 minutes, or until a toothpick inserted in the center comes out clean. The top should be golden and slightly crispy around the edges. Every oven varies, so start checking around 35 minutes—switching racks or adjusting temp slightly can help you get that perfect bake.
Step 8: Cool & Glaze
Let the cake cool in the pan for about 10 minutes, then transfer to a wire rack. Drizzle on the glaze while it’s still slightly warm—this helps it soak in just right. The glaze should be pourable but not runny; if it’s too thick, add a splash more milk or lemon juice.
Step 9: Slice & Serve
Once cooled completely, slice and serve! I love it warm with a dollop of whipped cream or just as is with a cup of coffee or tea. The moist crumb, the toasted coconut on top, and the swirls of zucchini—it’s like a little piece of comfort each time.
What to Serve It With
This cake is super versatile. For breakfast, I love serving it with a strong cup of black coffee or a frothy cappuccino—something to balance the sweetness. It’s also stunning on a brunch table, maybe with a spread of fresh berries and a side of yogurt. When I serve it as a dessert, I usually add a dusting of extra coconut or a spoonful of mascarpone. Sometimes, I even drizzle a little caramel or chocolate over the top if I want to make it extra indulgent. As a casual snack, it’s perfect plain or warmed up with a little butter or jam. I’ve learned that it tastes even better the next day, once the flavors meld, so I often make it ahead to enjoy whenever the mood strikes.
Top Tips for Perfecting Your Zucchini Coconut Coffee Cake
Over the years, I’ve picked up a few tricks to make this cake turn out even better. First, for the zucchini, I always shred and then squeeze out excess moisture—if not, the cake can get a bit saggy. I tested it with grated, undrained zucchini, and let’s just say it wasn’t pretty—soggy and dense. Now, I always drain well, and it transforms the texture completely.
When mixing, be careful not to overwork the batter. A gentle fold is all it needs. Overmixing can make the crumb tough, and nobody wants a dry cake!
Swirling the filling is my favorite part—try to do it gently so the zucchini flavor still peeks through in beautiful streaks. For a more colorful twist, I’ve added a few drops of food coloring to the batter—sometimes purple with blueberries, or pink with strawberries. Fun, and it’s a hit with kids!
Substituting ingredients is also fun here. I’ve tested using coconut sugar instead of white sugar, and it adds a nice caramel note. If you want to make it gluten-free, almond or oat flour works well, but you might need to adjust the liquids slightly to keep it moist.
For baking, I always double-check the cake around the 35-minute mark. Every oven is different—some run hot, some cold. A toothpick is your best friend. When it comes out clean and the top is golden, you’re good.
Finally, don’t skip the glaze if you want that extra touch of sweetness and shine. If you’re low on powdered sugar, a simple dusting of cinnamon sugar works surprisingly well too. And trust me—this cake tastes even better with that extra coconut on top, toasted until golden.
This recipe has become a staple in my house, and I constantly tweak it—adding nuts, swapping coconut for chopped chocolate, or playing with the filling spices. It’s one of those dishes that never fails to bring a smile. I hope you try it and find your own tweaks—happy baking!
Storing and Reheating Tips
This cake keeps beautifully for a few days, which is a blessing because once you taste it, it disappears in minutes at my house. To store, just keep it covered at room temperature for up to two days; after that, I prefer refrigeration. Wrap it tightly in plastic wrap or store in an airtight container—it also makes the slices stay moist and fresh. If you want to enjoy it later, pop a slice in the microwave for about 10-15 seconds—it warms up nicely, especially if you add a splash of milk before microwaving. For longer storage, freezing individual slices wrapped in plastic and foil works great. Just thaw at room temperature or warm in the microwave. If you’ve glazed it, wait until you’re ready to serve to add the glaze—otherwise, it can get a little sticky after refrigeration. The trick is to keep it moist, flavorful, and fresh without losing that tender crumb or toasted coconut crunch.
Frequently Asked Questions
Final Thoughts
This zucchini coconut coffee cake has become my secret weapon for cozy weekends and last-minute brunches. It’s simple enough to whip up on a busy afternoon but feels indulgent and nourishing at the same time. The combination of moist zucchini, toasted coconut, and warm spices just hits all the right notes for me—comfort, flavor, and a little bit of healthy sneaking in. Every time I bake it, I get these little nostalgic feels; it reminds me of family mornings, relaxed Sundays, and the joy of sharing something homemade. I love that it’s versatile—perfect for breakfast, an afternoon treat, or dessert. Plus, it’s so forgiving—you can swap ingredients, tweak sweetness, and still end up with a masterpiece. I can’t wait to hear how yours turns out or if you come up with your own spin. Happy baking, and, as always, enjoy every crumb!
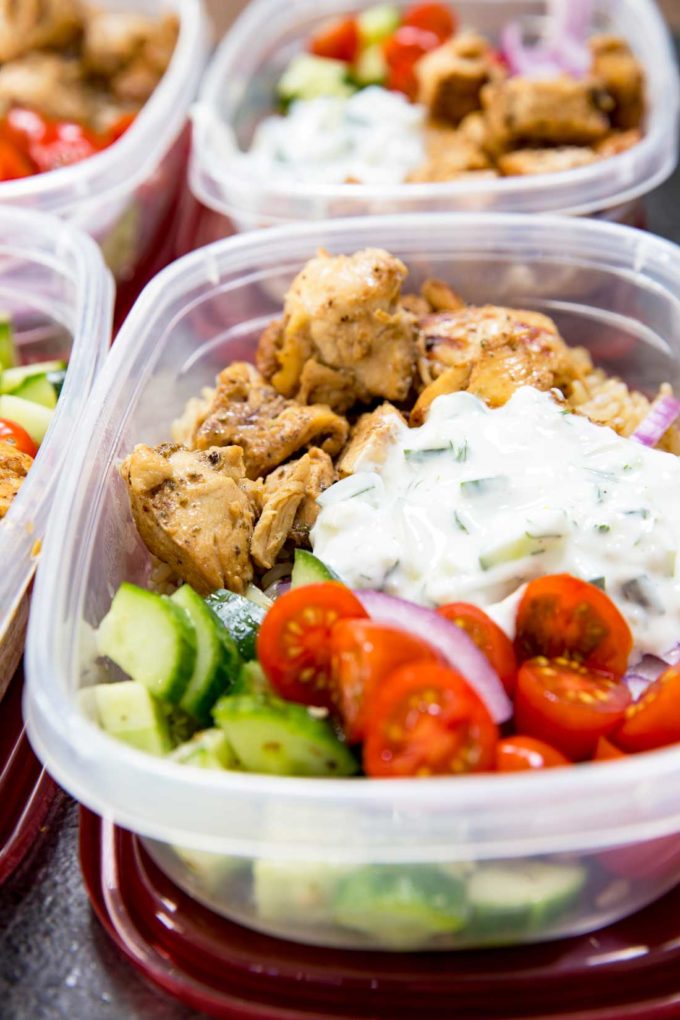
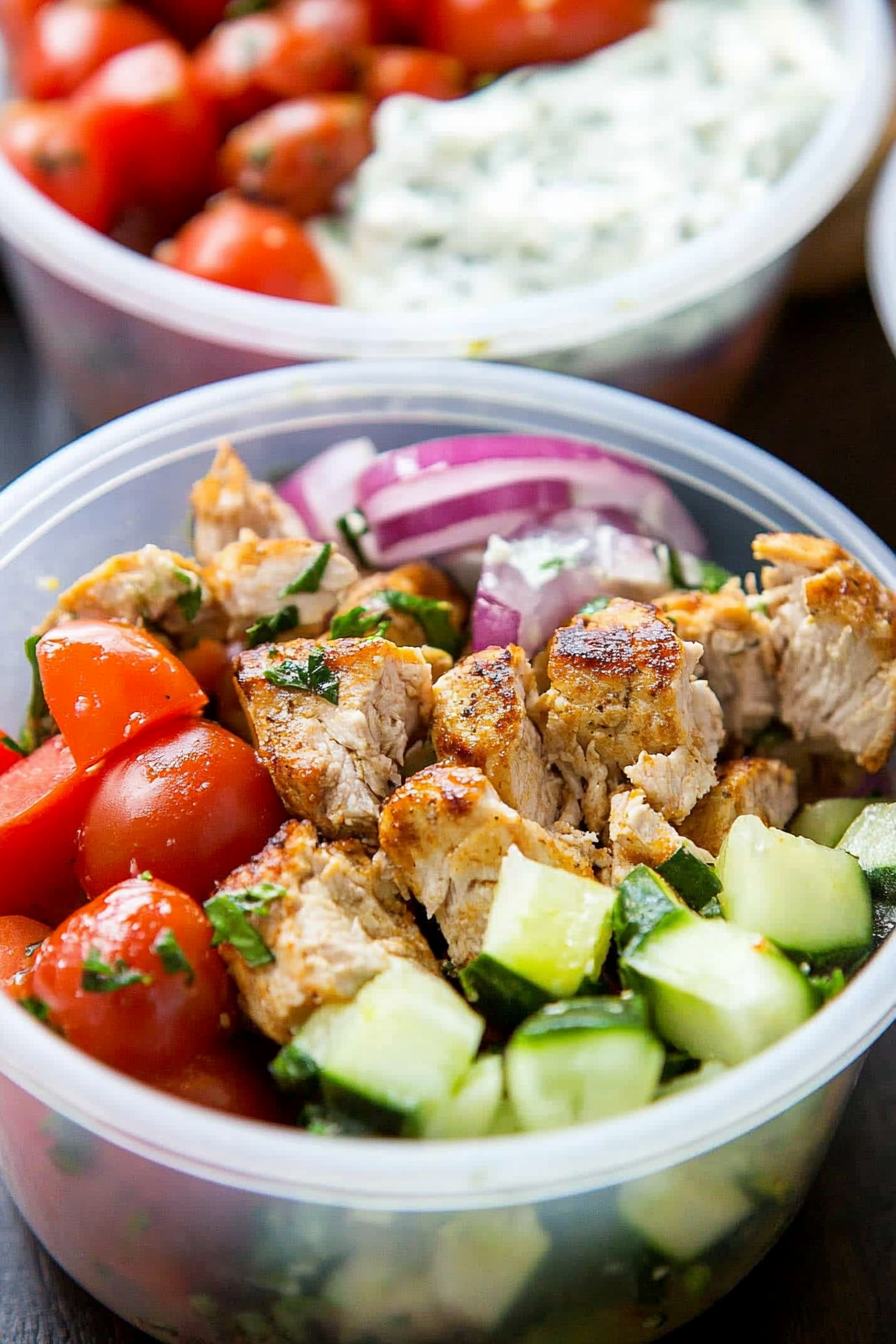
Greek chicken bowls
Ingredients
Method
- In a large zip bag, combine olive oil, garlic, lemon juice, red wine vinegar, oregano, Greek yogurt, salt, and pepper. Massage to mix.
- Add chicken into the bag, ensure full coverage, and marinate for at least 20 minutes or up to 12 hours.
- Drain the chicken and discard marinade. Heat a skillet over medium-high heat with a little olive oil.
- Cook chicken for about 3-4 minutes per side until internal temperature reaches 165 degrees F. Remove and let cool, then cut into bite-sized pieces.
- Meanwhile, prepare cucumber salad by tossing chopped cucumbers with lemon juice, olive oil, vinegar, garlic, and oregano. Set aside.
- Make tzatziki by combining Greek yogurt, diced cucumber, garlic, dill, lemon juice, lemon zest, and season with salt, pepper, and mint if desired.
- Refrigerate tzatziki and cucumber salad while assembling bowls.
- Cook brown rice as per package directions. Divide into meal prep containers, then top with sliced chicken, cucumber salad, cherry tomatoes, and red onion slices.
- Add a dollop of tzatziki to each bowl. Cover and refrigerate for 3-5 days. Serve cold.


This sounds amazing—I love how cozy and flavorful it looks! Zucchini and coconut together must be incredible.
Love this idea! The combination of Greek flavors and a cozy coffee cake sounds perfect for meal prep.
Love this idea! Greek chicken bowls are such a great meal prep option—so flavorful and easy to customize.
Love this idea! The combination of Greek flavors and coconut sounds so fresh—perfect for meal prep.