
Smoky Tofu BBQ How to Make It Amazing
You know that feeling when you peel back the foil on a fresh-baked treat and the warm, sweet aroma floats around the kitchen? That’s how I felt the first time I made this zucchini swirl cake. It’s a recipe I’ve been tinkering with for years—my go-to when I want something that feels special but is honestly crazy easy to pull together after a long day. My kids ask for this all the time, and honestly, I don’t blame them. The secret is in how everything just comes together—moist, tender, with a hint of cinnamon and that gorgeous swirl of sweet filling. Plus, it’s a sneaky way to get some veggies in—and trust me, no kid notices! It’s kinda like a smarter banana bread, but with a fudgy, marbled twist that disappears in minutes at my house. Whether it’s for breakfast, a casual snack, or dessert, this zucchini swirl cake is comfort food at its best. Grab a cup of coffee and let me walk you through how to make this magic happen. You’re going to love sharing this with your family—or keeping it all to yourself, I won’t judge!
What is Zucchini Swirl Cake?
Think of this as a cross between a cozy, crumbly coffee cake and a rich, marbled dessert. It’s essentially a moist cake packed with grated zucchini—more like a secret ingredient that makes everything better—and swirled with a luscious cinnamon-spiced filling. The name says it all: “zucchini swirl cake.” The swirls of extra sweetness run through each bite, making it look like a work of art. It’s inspired by classic American crumb cakes but jazzed up a little with the freshness of zucchini, which keeps the batter tender and moist without adding any weird flavors. The name “swirl” is perfect because I love swirling the filling into the batter like you’re creating a marbled masterpiece. It’s a humble-yet-elegant cake you can whip up any Sunday morning or serve at brunch when you want to impress without stressing. It’s also a bonus that it’s practically a one-bowl scenario—less mess, more enjoying. That’s my kind of baking, don’t you think?
Why you’ll love this recipe?
What I love most about this zucchini swirl cake is how it marries simplicity with a punch of flavor. The moment you cut into it, the smell alone melts everyone’s hearts — rich cinnamon mingled with the fresh green fragrance of zucchini. The texture is unreal—moist, tender crumb with that luscious swirl of cinnamon-spiced filling oozing through. Plus, it’s super budget-friendly since the main ingredients are pantry staples—flour, sugar, zucchini, eggs, and a bit of oil. You can swap out ingredients almost endlessly, making it customizable to what you have lying around. My kids actually ask for seconds, which is saying something when they’re notoriously picky about veggies! And the best part? You don’t need fancy equipment—just a bowl, a spoon, and your oven. It’s basically a no-fail recipe that I’ve made dozens of times, and every time, it turns out beautifully. What I love most about this is how it feels like a little hug in cake form. Perfect for cozy mornings, lazy afternoons, or last-minute guests. And trust me, this one’s a lifesaver on busy nights when you need a quick, comforting treat that doesn’t sacrifice flavor for ease.
How do I make Zucchini Swirl Cake?
Quick Overview
This cake comes together faster than you’d think! Start by grating zucchini (don’t forget to squeeze out some excess moisture, or it might turn out a little too dense). Mix your dry ingredients in a bowl—flour, baking powder, cinnamon. Then, in another bowl, whisk eggs, oil, vanilla, and sugar until smooth. Combine the wet and dry, fold in the grated zucchini, then pour half into your baking pan. Swirl a cinnamon-sugar filling over the first layer, add the rest of the batter, and finish with a pretty marbled swirl. Bake until golden, cool just enough to handle, then drizzle with a simple glaze or dust with powdered sugar. It’s honestly so forgiving, and I swear, the smell alone will make your house feel like a bakery.
Ingredients
For the Main Batter:
– 2 cups of all-purpose flour (I prefer unbleached for flavor)
– 1 teaspoon baking powder
– 1 teaspoon cinnamon (plus extra for the filling!)
– ½ teaspoon salt
– ½ cup vegetable oil or melted butter
– 3 large eggs
– 1 cup sugar (can reduce slightly for less sweetness)
– 1 teaspoon vanilla extract
– 1 ½ cups grated zucchini (squeezed dry to avoid sogginess)
For the Filling:
– ⅓ cup brown sugar
– 1 teaspoon cinnamon
– 2 tablespoons melted butter
– Optional: chopped walnuts or mini chocolate chips for extra texture
For the Glaze:
– ½ cup powdered sugar
– 1-2 tablespoons milk or lemon juice
– A touch of vanilla or lemon zest for extra flavor
Step-by-Step Instructions
Step 1: Preheat & Prep Pan
Preheat your oven to 350°F (175°C). Grease a 9-inch round cake pan or line it with parchment paper—trust me, this helps with clean slices later. If you want a super tender crust, you can lightly flour the pan, but I usually just butter it and that’s enough. Get your zucchini ready—grate it on the box grater, then give it a good squeeze to remove excess moisture. I do this by wrapping it in a clean dish towel and pressing out the water—this step keeps the batter light and fluffy, not soggy.
Step 2: Mix Dry Ingredients
In a large bowl, whisk together the flour, baking powder, cinnamon, and salt. This ensures even distribution of leavening and spices—key for that perfect rise and flavor. I’d recommend doing this by hand to avoid overmixing later. Overmixing can make the cake a little dense, and nobody wants that.
Step 3: Mix Wet Ingredients
In another bowl, beat the eggs, sugar, vanilla, and oil until smooth and slightly frothy—about a minute with a whisk or hand mixer. The mixture should look glossy and homogenous. I tested adding a splash of almond extract once, and it added a lovely depth—definitely try different flavor tweaks if you want to get creative.
Step 4: Combine
Pour the wet ingredients into the dry, gently folding just until the mixture is combined. No whisking vigorously—just a few strokes. Then, fold in the grated zucchini. The batter will look a little thick, that’s perfect. If it feels too stiff, I sometimes add a splash of milk, but generally, it’s good as is.
Step 5: Prepare Filling
Mix the brown sugar, cinnamon, and melted butter together until crumbly. If you’re feeling nuts or chocolate chips, fold those in now. This filling adds that irresistible swirl of sweetness and spice—what takes this cake from plain to wow.
Step 6: Layer & Swirl
Pour half of the batter into your prepared pan. Spread evenly, then sprinkle the cinnamon-sugar filling over it. Drop the remaining batter by spoonfuls on top, and then use a knife or skewer to swirl through, creating pretty marbled patterns. Don’t overmix—you want the swirl to be visible and artistic, not a uniform mix.
Step 7: Bake
Pop it into your preheated oven and bake for about 35-40 minutes. Check doneness with a toothpick—if it comes out clean, you’re good. Every oven is different, so keep an eye on the last 10 minutes; I’ve had mine turn golden in less time or need a little longer. If the top gets too brown before the center is set, tent it with foil.
Step 8: Cool & Glaze
Let it cool in the pan for 10 minutes, then transfer to a wire rack. If you’re using glaze, whisk together the powdered sugar with a splash of milk or lemon juice. When the cake is just slightly warm—never hot—it’s the perfect time to drizzle or brush on the glaze. It soaks in just enough to add a shiny, tasty finish.
Step 9: Slice & Serve
When completely cooled, slice with a serrated knife. The swirl pattern looks so pretty when you cut—mine usually gets demolished pretty quick. I like serving it warm with a dollop of whipped cream or just plain dusted with powdered sugar. It’s a piece of home no matter how fancy or casual the occasion.
What to Serve It With
Honestly, this cake is so versatile, it kind of pairs with everything. For breakfast, it’s a gorgeous start with a cup of black coffee or a splash of milk. My kids love it with a glass of cold milk and some fresh berries—those bright flavors complement the richness of the cake perfectly. On lazy brunch mornings, I sprinkle some extra cinnamon or add a drizzle of honey on top, making it feel a bit more indulgent. As a dessert, it’s delightful on its own, but I sometimes serve it alongside a scoop of vanilla ice cream or a tangy berry compote. If I’m in a more casual mood, I cut thick chunks and pack them for picnics or quick bites after school. Honestly, this cake is my secret weapon for turning simple ingredients into a celebration—plus, it’s so good, I keep making it even when I’m not feeling creative. Trust me, once you try it, you’ll find endless ways to enjoy this zucchini swirl cake—make it your own!
Top Tips for Perfecting Your Zucchini Swirl Cake
Every time I make this, I learn a little more—baking’s all about those small details. Here are some tricks that have saved me from a few mishaps and made my cake even better:
Zucchini Prep: As I mentioned, squeezing out moisture is key. If the zucchini isn’t dry enough, the batter can turn out too dense or soggy. I’ve made this mistake more than once, especially when I forget to do it or try to save time—trust me, your cake will thank you if you do this step thoroughly.
Mixing Advice: The biggest rookie mistake I see is overmixing once the wet and dry ingredients come together. It’s tempting to stir vigorously, but that develops gluten and makes the crumb dense. Gentle folding is your friend here. Look for a few streaks of flour and stop mixing—your cake will stay light and airy.
Swirl Customization: I love swirling in different flavors—cocoa, fruit preserves, or even lemon zest mixed with sugar. When layering, don’t overdo the swirl—just a few strokes are enough to create that beautiful marbled look. If you go too wild, the filling and batter blend together into a muddy mess.
Ingredient Swaps: For a lighter version, you can substitute half the oil with unsweetened applesauce—works like a charm! Want to make it gluten-free? Mix in some almond or rice flour, but keep the ratios in mind for texture. Sometimes I swap out sugar for honey or maple syrup—I find the flavor’s richer, but you’ll need to adjust the wet ingredients slightly.
Baking Tips: My oven runs hot, so I always check around the 35-minute mark. If your cake’s golden but the toothpick isn’t clean, give it a few extra minutes. Rotating the pan halfway through baking helps get an even rise, especially if your oven has hot spots. And don’t forget—cool it completely before glazing to prevent melting or uneven drips.
Glaze Variations: I’ve tested cream cheese frosting and Greek yogurt glaze—both are delicious, especially with a squeeze of lemon. For a more adult twist, sprinkle a little bourbon vanilla or almond extract into your glaze. The key is to keep it pourable but not runny, so it evenly coats the top without pooling too much.
Over the years, I’ve tweaked little things—like adding a splash of orange zest here or swapping cinnamon for cardamom there—and honestly, each time I get closer to that perfect bite. My best advice? Don’t be afraid to experiment—baking is part science, part art. Trust your taste buds and your instincts, and you’ll be rewarded with a slice of happiness every time.
Storing and Reheating Tips
This cake is best enjoyed within a couple of days, but it can definitely be stored for later if you follow a few simple tips. Wrap it tightly in plastic wrap or store in an airtight container—keeps the moisture locked in and prevents it from drying out.
Room Temperature: It’s fine for a day or two if kept in a cool, dry place, wrapped well. Just make sure the glaze (if any) has hardened—that way, it won’t get sticky.
Refrigerator Storage: For longer storage, pop it in the fridge. The cake stays fresh for about 4 days—just take it out 20 minutes before slicing so it’s not too cold, which can make it crumbly.
Freezer Instructions: Wrap slices individually in plastic wrap, then foil, and store for up to 3 months. Thaw at room temp for about an hour. Trust me, this is perfect for making ahead—the flavor only gets better as it sits.
Glaze Timing: If you want the glaze to look glossy and fresh, apply it just before serving. If it’s been refrigerated, pop the cake back in the oven for a few minutes to warm it slightly—then add the glaze for a fresh, shiny finish.
My guarantee? This cake keeps well if stored right, and honestly, it’s just as delicious cold or slightly warmed. Just a tip: warm slices in a microwave burst of 10-15 seconds—perfect for when you want that comfort-treat feeling happening again.
Frequently Asked Questions
Final Thoughts
This zucchini swirl cake has become one of my most treasured recipes—each time I bake it, a little wave of nostalgia washes over me. It embodies everything I love about baking: simple ingredients, a touch of magic, and the warm feeling of sharing something homemade with loved ones. It’s forgiving, flexible, and endlessly customizable. Whether you add walnuts, swap out the filling, or top it with fresh berries, it always comes out delicious. I hope you give it a try and find as much comfort and joy in making it as I do. And hey, I’d love to hear how yours turns out—leave a comment, share your tweaks, or just tell me how much everyone loved that swirl pattern! Happy baking, my friend—this one’s a keeper for sure!
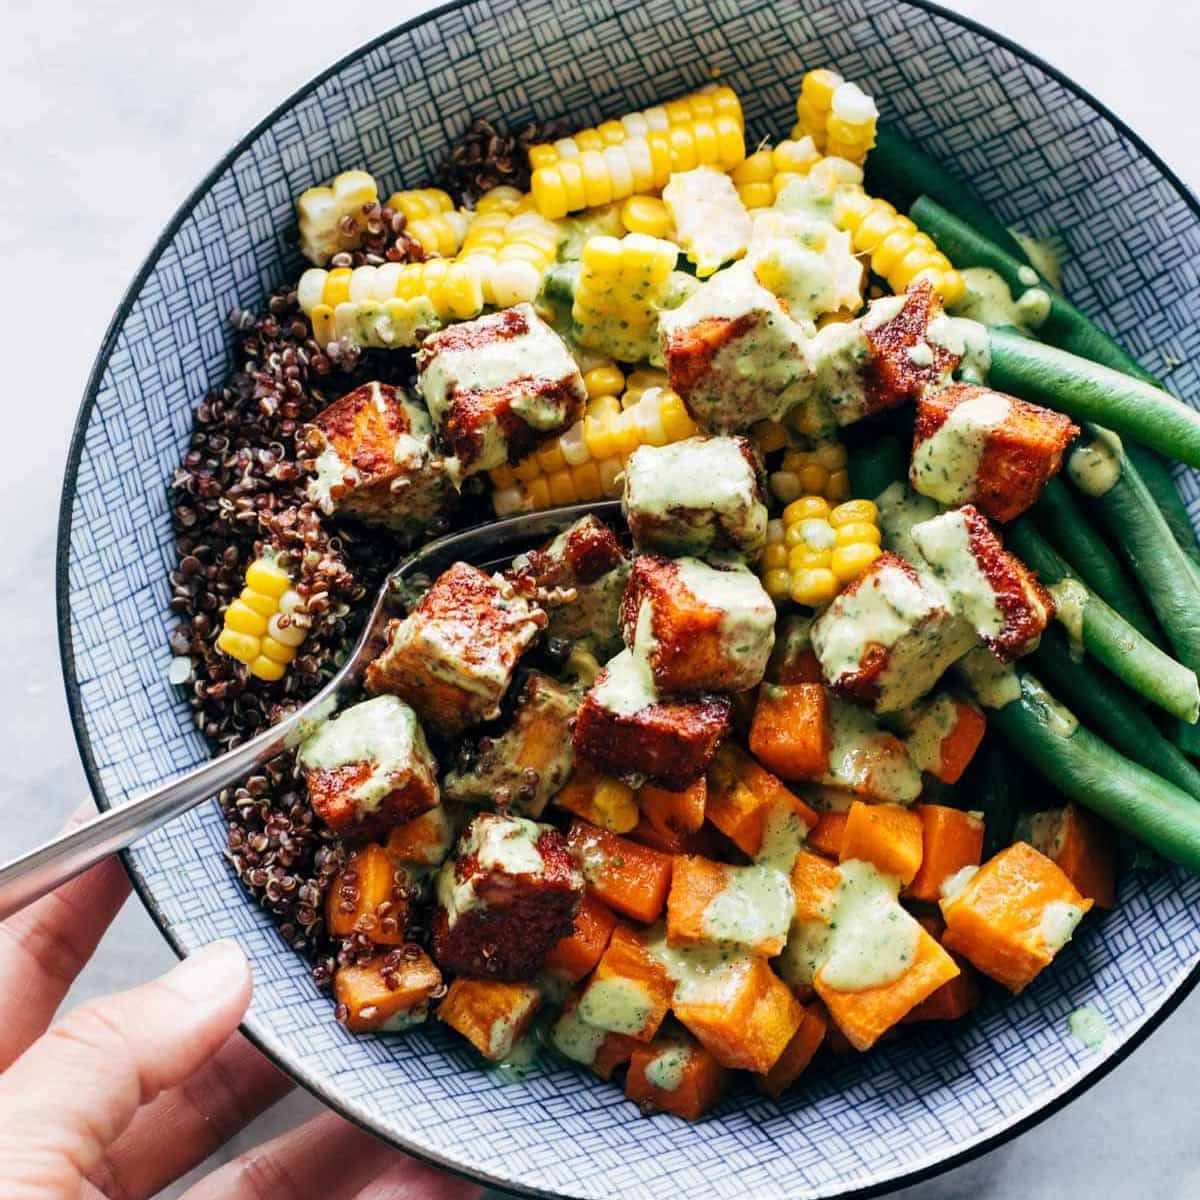
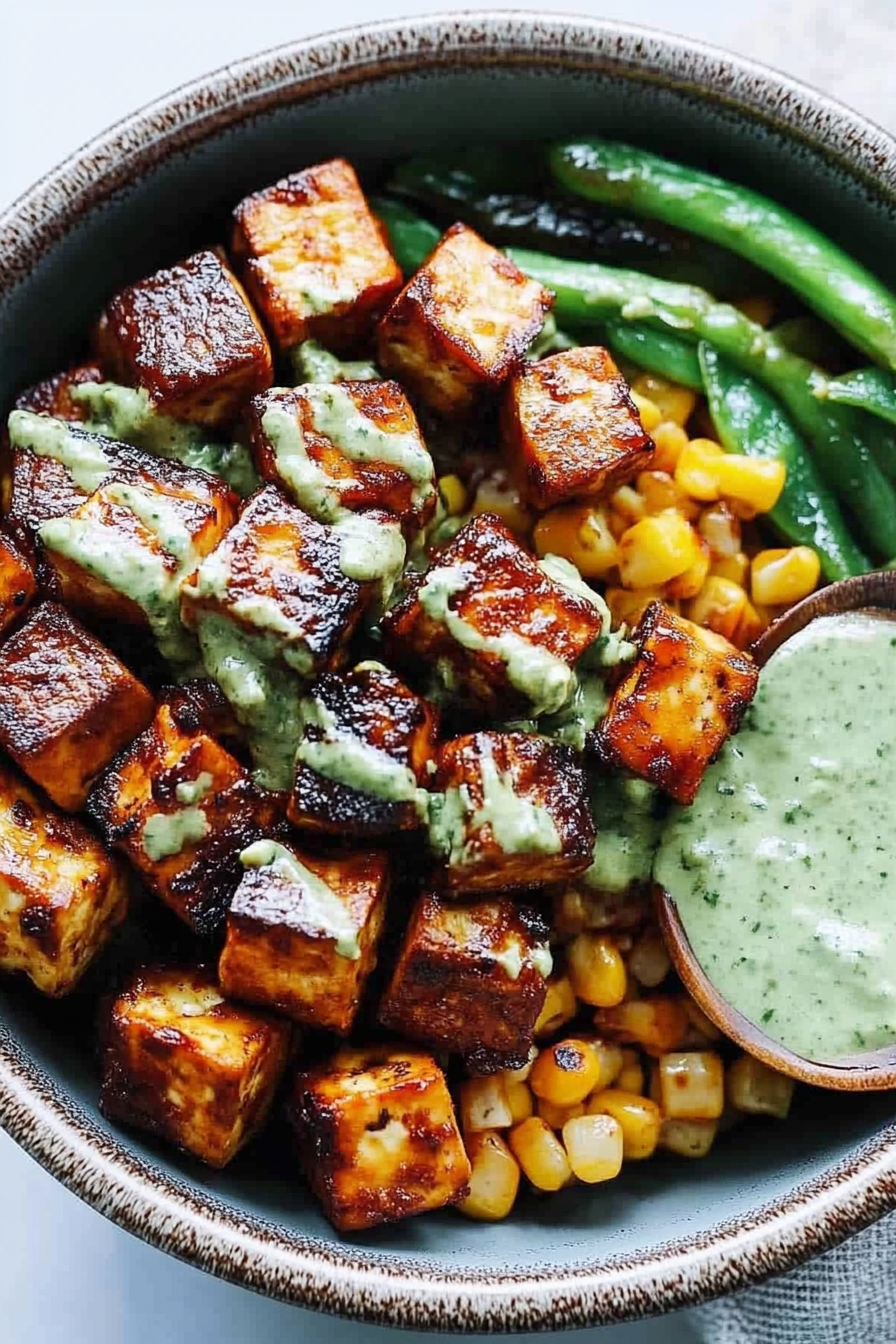
BBQ tofu
Ingredients
Method
- Preheat the oven to 425 degrees Fahrenheit.
- Press the tofu to remove excess water, then cut into cubes.
- Mix cornstarch, brown sugar, spices, and salt. Gently coat tofu cubes with the spice mixture. Place on a baking sheet, drizzle with olive oil, and bake for 30-45 minutes until golden and crispy.
- Serve the baked BBQ tofu in bowls, with desired accompaniments.

I love this! That smoky tofu BBQ sounds amazing—definitely trying it this weekend. The aroma part really hits home too!
I totally get that cozy kitchen vibe—this tofu BBQ recipe sounds amazing and comforting!
I totally get that smell—it’s like comfort in the air! Tofu BBQ sounds amazing, can’t wait to try it.
I love how this captures the cozy, comforting vibe of cooking—sounds like a dish that’ll hit the spot!