
Spooky Oreo Treats How to Make Them
Have you ever stumbled upon a dessert so unexpectedly good that it makes you double-take? That’s exactly what happened to me the first time I made this zucchini snacking cake. I remember peeling and grating the zucchini late one evening — tired, craving something sweet, and thinking ‘Why not?’. Well, I’m telling you now, it turned out so better than I expected, I practically did a happy dance in my kitchen. The aroma alone—warm spices and the faint sweetness—fills the house, and the best part? You’d never suspect there’s zucchini lurking in the middle. It’s the kind of cake that feels a little rebellious—healthy enough to justify a second slice—yet indulgent enough to satisfy every sweet tooth. Honestly, this one’s a lifesaver on busy nights when you want something quick and comforting. My kids actually ask for this all the time, and I love that they’re secretly eating vegetables. Trust me on this one: once you try it, it’s going to become a regular in your baking rotation.
What is Zucchini Snacking Cake?
This zucchini snacking cake is basically a cozy, moist cake packed with grated zucchini that keeps it super tender, almost like a bread but with the sweetness of a classic sponge cake. Think of it as a little secret—hidden veggies that don’t compromise flavor, but actually enhance moisture and texture. It’s the kind of dessert you can enjoy with your morning coffee, pack in a lunchbox, or serve as a casual after-dinner treat. The name is pretty straightforward—‘snacking cake’ because it’s perfect for slicing into squares and nibbling on whenever you get a craving. Its roots are in those rustic, no-fuss cakes we used to make Sunday afternoons with whatever was in the fridge. The magic is in the simplicity: simple ingredients, easy steps, and a big payoff. It’s essentially a love letter to the humble zucchini, transforming it into something irresistibly sweet and moist—without any complicated fuss.
Why you’ll love this recipe?
Honestly, what I love most about this zucchini snacking cake is how it balances health and indulgence without feeling like you’re sacrificing anything. The moistness is unbelievable—thanks to the grated zucchini and a touch of oil—making every bite feel like a warm hug. Plus, it’s incredibly simple to make; I always do this when I’ve got last-minute guests or need a quick treat for my kids’ lunchboxes. You don’t need fancy equipment or hours in the kitchen. Just grate, mix, pour, and bake. It’s budget-friendly, too—using pantry staples like flour, sugar, and spices—and you probably have most of these in your cupboard right now. One thing I love most is how versatile it is: add some chopped nuts for crunch, or fold in a handful of chocolate chips if you want to take it to the next level. What I really appreciate about this cake is its ability to adapt for different tastes—it’s a white canvas for all your baking whims. And the best part? It’s super forgiving. I’ve tested making it with almond milk instead of regular milk, and you know what? It made it even creamier! This cake isn’t just comfort food; it’s a little piece of baking joy that I keep coming back to.
How do I make Zucchini Snacking Cake?
Quick Overview
This zucchini snacking cake is actually pretty straightforward—think of it as a simple one-bowl deal that comes together quickly. You start by preheating your oven and preparing your pan, then whisk together your dry ingredients like flour, baking powder, and spices. In a separate bowl, you blend the wet ingredients—oil, sugar, eggs, and vanilla—until smooth. After that, you gently fold the grated zucchini into the wet mixture, then combine everything, pour it into your pan, and bake. The smell alone is worth every second of the wait, and once it’s baked to perfection, a quick cool and glaze elevate it to bakery-status. It’s a foolproof process that results in a cake so moist and flavorful, it’s become my go-to for all kinds of occasions, from casual mornings to cozy evenings.
Ingredients
For the Main Batter:
- 1¾ cups all-purpose flour (I like unbleached—it just feels sturdier)
- 1 teaspoon baking powder
- ½ teaspoon baking soda
- ½ teaspoon ground cinnamon (if you like a warm cozy flavor)
- ¼ teaspoon ground nutmeg (totally optional, but adds depth)
- ½ teaspoon salt
- ¾ cup granulated sugar (can reduce slightly if you want it less sweet)
- ⅓ cup vegetable oil or melted coconut oil (whatever you have on hand)
- 2 large eggs (or flax eggs for a vegan twist)
- 1 teaspoon vanilla extract
- 1½ cups grated zucchini (the moist kind, peeled or not; I test both)
For the Filling (optional):
- ½ cup chopped walnuts or pecans
- ½ cup chocolate chips or dried fruit (think raisins or cranberries)
For the Glaze:
- ½ cup powdered sugar
- 1–2 teaspoons milk or lemon juice (for flavor and consistency)
- ½ teaspoon vanilla extract (optional, but nice)
Step-by-Step Instructions
Step 1: Preheat & Prep Pan
Set your oven to 350°F (175°C). Lightly grease your baking pan—2 ½ or 9-inch square or round works nicely—or line it with parchment paper. I always do this first so I don’t forget later. If you’re using an 8×8 or 9-inch square, it’s perfect for getting thick, moist slices. Keep your zucchini grated and ready — I like to do this first and let it sit in a paper towel to soak up excess moisture, especially if your zucchinis are really watery. Trust me, soaking it a little prevents your cake from becoming too soggy.
Step 2: Mix Dry Ingredients
In a large bowl, whisk together flour, baking powder, baking soda, cinnamon, nutmeg, and salt. This ensures all those spices and leaveners are evenly distributed, which is key for a nice rise and balanced flavor. I’ve learned that a good mix here prevents clumps of baking soda or uneven spice distribution in the final cake.
Step 3: Mix Wet Ingredients
In a separate bowl, combine oil, sugar, and eggs. Whisk until everything’s smooth—this is where you get that slightly glossy, wet look. I’ve tested using brown sugar instead of white, and it adds a lovely caramel undertone, but regular granulated works beautifully too. Add vanilla, and stir well. The smell of vanilla with the spices is already making my kitchen smell cozy and inviting.
Step 4: Combine
Pour the wet mixture into the dry ingredients, folding gently with a spatula until just combined. Don’t overmix, or your cake could turn a little dense. Then, fold in the grated zucchini—this is the secret weapon! If you’ve soaked it well, it won’t make your batter too watery, but if it’s extra moist, just toss it in a paper towel first. Lightly fold until everything looks just combined—think gentle, fold, fold, fold.
Step 5: Prepare Filling
If you’re adding nuts or chocolate chips, now’s the time. Mix them into the batter gently so you don’t make the batter heavy or deflate the leavening.
Step 6: Layer & Swirl
Pour half of the batter into your prepared pan, then add dollops of your filling—nuts or chocolate—and cover with the rest of the batter. For a pretty swirl, use a skewer or knife to gently drag through the batter, creating beautiful marble-like patterns. This makes every slice look artsy and inviting—plus, it’s fun to do!
Step 7: Bake
Bake for about 50-55 minutes, or until a toothpick inserted into the center comes out clean. I like to start checking around the 45-minute mark since oven temps can vary. If the top gets too golden before the center’s done, loosely cover with foil. The smell during baking is irresistible—a warm, spicy aroma that instantly makes everyone want a piece.
Step 8: Cool & Glaze
Allow the cake to cool in the pan for about 15 minutes, then transfer it to a wire rack. Once completely cooled, mix your glaze ingredients and drizzle over the top. The glaze adds a lovely touch of sweetness and a bit of shiny goodness. If you’re short on time, a dusting of powdered sugar works too—it still looks great and tastes delicious.
Step 9: Slice & Serve
Slice into squares or thick slices—whatever you prefer. For the best presentation, use a serrated knife and clean it often. This cake is lovely served slightly warm or at room temperature. My favorite way is with a cup of coffee or a glass of milk. I promise, once you taste it, you’ll be sneaking a second piece — guilt-free, I swear!
What to Serve It With
This zucchini snacking cake is so versatile; it pairs with different drinks and settings effortlessly. For a lazy Sunday morning, serve it with a strong cup of coffee or tea — the warmth of the mug and the cozy aroma are pure bliss. My family loves it as a brunch centerpiece, especially when I add a handful of blueberries or a sprinkle of toasted coconut on top. It also makes a fabulous afternoon snack—cut into tiny squares and served with a dollop of whipped cream or Greek yogurt. When it’s game night or casual gatherings, I love turning it into a dessert platter, with the glaze or even a swirl of mascarpone cheese. Sometimes I top it with a dusting of cinnamon sugar or chopped nuts for extra flair. Honestly, it’s one of those recipes I keep on hand because it’s not just a dessert—it’s a way to bring comfort and smiles to everyone around the table.
Top Tips for Perfecting Your Zucchini Snacking Cake
Make no mistake, even the most seasoned bakers can have a few hiccups, but these tips will help you master this recipe with ease:
- Zucchini Prep: Always squeeze out excess moisture—trust me, this keeps your cake moist but not soggy. A quick press with a paper towel or clean dish towel does wonders.
- Mixing Advice: Overmixing the batter can lead to a dense texture. Fold gently until just combined; you want light, airy crumbs.
- Swirl Customization: If you want more visual flair, try layering batter and filling, then swirling with a toothpick for a more dramatic marble pattern.
- Ingredient Swaps: Coconut sugar gives a deeper caramel flavor, and flax eggs work perfectly for vegan baking. Just adjust the moisture slightly as needed.
- Baking Tips: Oven temps can vary—if your cake tends to brown fast, tent it with foil around the 40-minute mark. Keep an eye out for a toothpick or cake tester coming out clean.
- Glaze Variations: For a citrusy zing, swap lemon juice for milk in your glaze. Or, toss in a pinch of cardamom for an exotic twist.
Over the years, I’ve learned to adapt and tweak this recipe based on what I’ve got, and each small variation gives it a new personality. What’s key is not rushing the cooling process—the cake needs to set so the glaze drapes beautifully and slices cleanly. Also, don’t be afraid to embrace imperfections—those little cracks or uneven patterns are part of its charm, and always taste delicious no matter what!
Storing and Reheating Tips
This cake keeps beautifully, and I’ve tested all the storage methods to make sure you get the best results.
Room Temperature: If you’re planning to eat it within a day, keep it covered with a clean towel or cake dome. It stays moist and fresh for up to two days in a cool room. Just remember, the glaze might soften a bit after sitting out, but that’s part of its charm.
Refrigerator Storage: Wrap slices tightly in plastic wrap or store in an airtight container for up to four days. I love chilling a slice for a half-hour—it heightens the flavors and firms it up for an even more satisfying bite.
Freezer Instructions: Wrap slices in plastic wrap, then foil, and pop them in a freezer bag. They hold well for up to three months. Thaw overnight in the fridge or at room temp for a quick treat. The texture remains moist and lovely even after freezing, especially if you add the glaze right before serving.
Glaze Timing Advice: For best presentation, add your glaze once the cake is cooled. If freezing or refrigerating, wait until it’s fully thawed before glazing to keep everything neat and shiny.
Frequently Asked Questions
Final Thoughts
There’s something truly special about a cake that sneaks in vegetables and leaves everyone begging for more. This zucchini snacking cake has become my family’s favorite—moist, flavorful, and surprisingly versatile. I love how a simple ingredient like zucchini can turn into something so satisfying and a little unexpected. Every time I bake it, I think about how my kids ask for seconds, and I feel proud knowing they’re eating something wholesome without even realizing it. Plus, it’s a recipe you can customize endlessly—add some spices, swap in different nuts, or lighten it with alternative flours. I encourage you to make it your own, experiment a little, and enjoy the cozy, homey aroma that fills your house. I’d love to hear how yours turns out—leave a comment, share your variations, or snap a photo of your finished cake. Happy baking! Remember, the best recipes are the ones you put a little love into, and I promise, this one’s worth every minute.
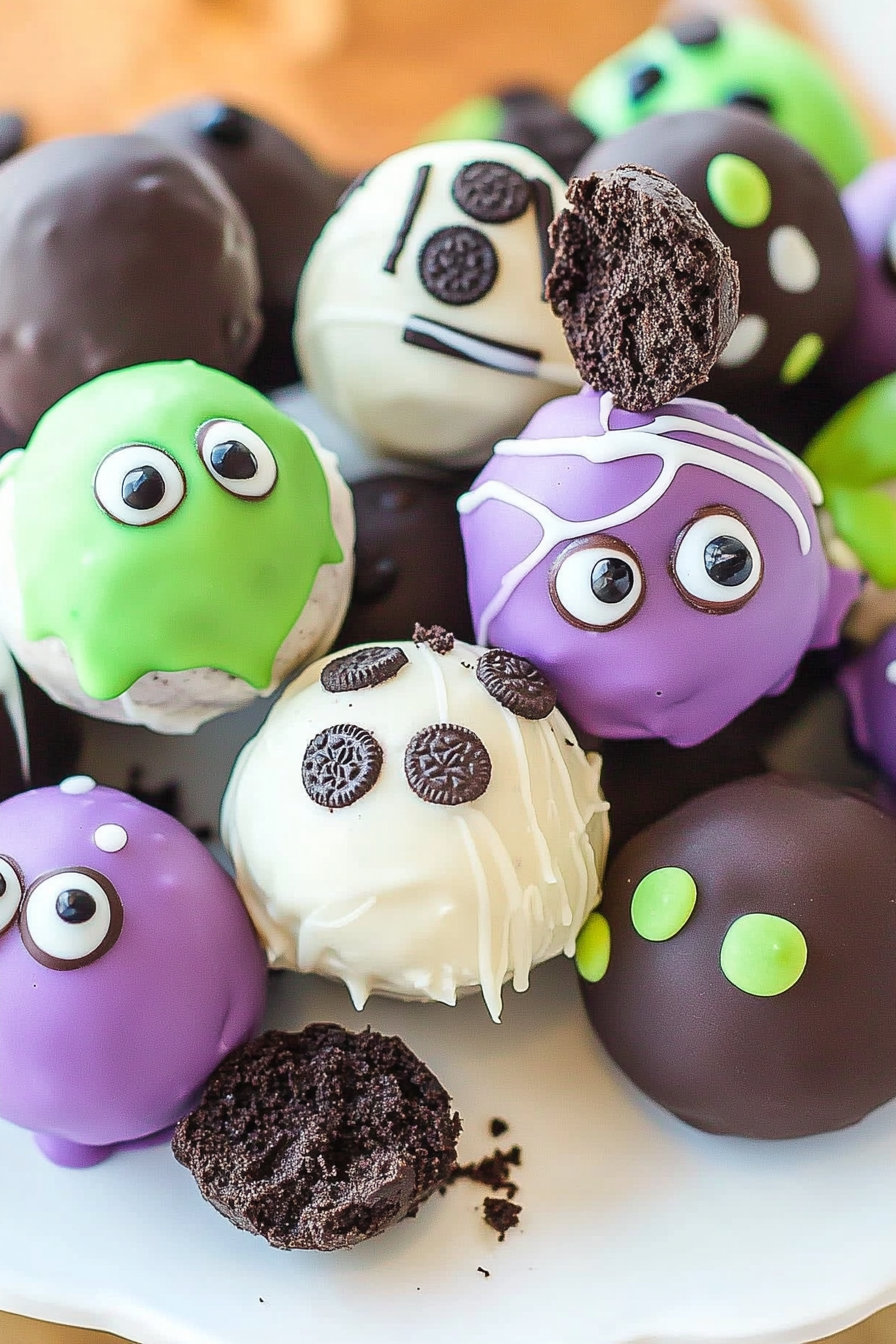
Oreo Balls
Ingredients
Method
- In a food processor, add Oreos and crush until fine crumbs.
- In a large mixing bowl, combine crushed Oreos, softened cream cheese, and vanilla extract. Mix until fully combined and dough-like.
- Using a 2 tablespoon scoop, form dough into smooth, round balls and place on a parchment-lined cookie sheet.
- Refrigerate the formed balls for 2 hours.
- Prepare melting wafers with Crisco in microwave-safe bowls, heating in 30-second bursts and stirring until smooth.
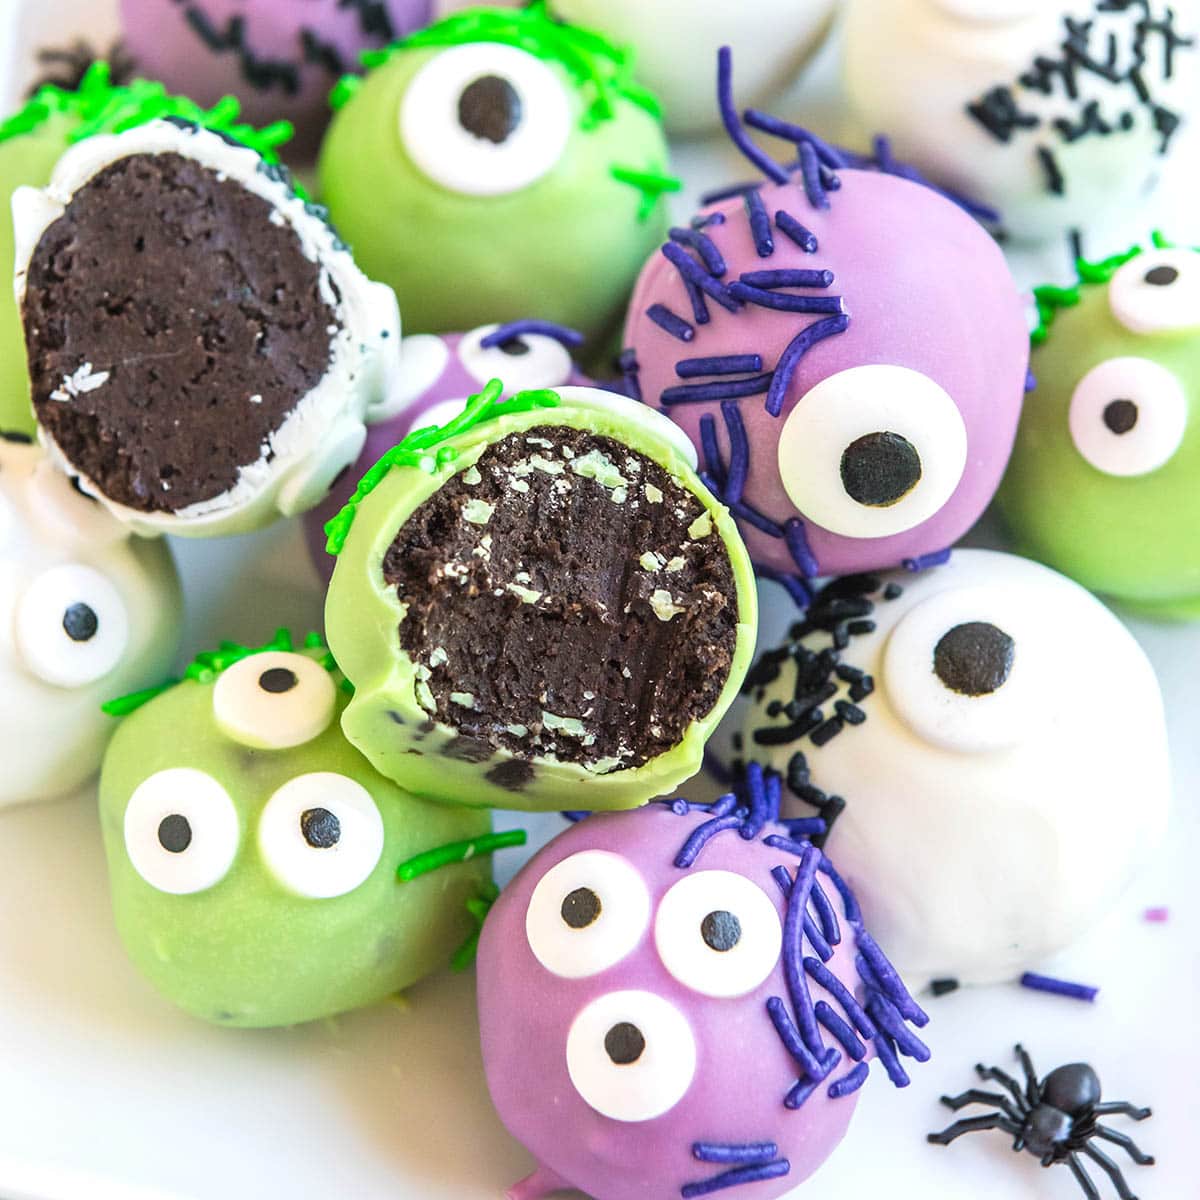
- Dip each Oreo ball into melted chocolate, using forks or dipping tools, and place back on parchment paper.
- Add candy eyes and sprinkles to the tops of the balls for fun decoration.
- Repeat the dipping and decorating process for each color of melting wafers.
- Allow the decorated Oreo balls to chill for an additional 30 minutes before serving.

These Oreo treats look absolutely delicious—I’ve never tried anything like them before! Definitely saving this recipe for the next Halloween party.
Ooooh, these look so fun! I love anything with Oreo—definitely giving this a try soon!
Ooh, these sound so fun and creepy at the same time! I’d love to try them for Halloween.
Ooooh, these Oreo treats look absolutely irresistible—I’ve been craving something like this for weeks! Definitely trying this recipe soon.
Ooh, those look delicious! I’ve never seen Oreos used like this—definitely trying these soon!