
Stacked Cabbage Rolls How to Make Them
You know those summer afternoons when the garden’s overflowing with zucchini, and you’re just scrambling to find new ways to use it all before it turns into that seed-filled monster? I’ve been there! And honestly, nothing beats the joy of turning these humble summer squash into this cozy, delicious zucchini quilt with that irresistible cream cheese swirl. It’s kind of like a cake, kind of like a bread, but totally unique in its own soft, sweet way. What I love most about this is how it’s the perfect combination of moist, tender zucchini and luscious cream cheese—my kids ask for this all the time, and it disappears faster than I can say “dessert!” Plus, it’s crazy easy to make, which on busy weeknights, is a total lifesaver. Trust me, once you try this, it’ll be on repeat in your kitchen, and your family will thank you every single time. This one’s a lifesaver when you’re craving something sweet but don’t want to turn the oven on for a whole cake. Let’s dive into making this magic happen!
What is Zucchini Quilt with Cream Cheese Swirl?
Think of the zucchini quilt as a soft, moist cake that cleverly hides shredded zucchini inside—kind of like a bread but with a fun layered twist. It’s essentially a sweet, tender batter that gets baked to golden perfection, then topped with a rich cream cheese swirl that melts into every bite. The name “quilt” comes from how the batter’s layered with swirls of cream cheese inside, creating a cozy, patchwork look—imagine a cozy quilt but in dessert form! It’s a simple treat that combines vegetable goodness with a touch of decadence, making it an excellent choice for breakfast, brunch, or simply whenever you need a quick comfort fix. And if you’ve ever made zucchini bread, you’ll find this soothing to the soul, but with an added surprise in every slice. It’s almost impossible to mess up, especially if you love the warm, homey smells of baked goodies wafting through your kitchen. The best part? It’s kid-approved, and you don’t need fancy ingredients—just pantry staples and a zucchini or two from your garden!
Why you’ll love this recipe?
What I love most about this zucchini quilt with cream cheese swirl is how comforting and versatile it is. The taste? Pure heaven. The zucchini keeps it moist and subtly nutritious, without ever overpowering the sweet flavor of the batter. Plus, the cream cheese swirl adds a tangy richness that makes it feel super indulgent—I swear, it’s like a match made in heaven! The smell alone when it’s baking is enough to bring everyone to the kitchen; it’s that cozy, buttery aroma that gets all your senses tingling. And let’s talk about how easy this is to whip up, even on a busy weekday. You don’t need fancy equipment or complicated steps—just mix, layer, and bake. It’s budget-friendly, too! A couple of zucchinis, some pantry basics, and you’re all set. I’ve made this countless times, and it never fails. It’s a sassy little dessert that can pass for breakfast or teatime, and I love experimenting with variations—sometimes I toss in a handful of cinnamon or lemon zest for extra zing. It’s also perfect when you want a homemade treat that feels special but takes almost no effort. Honestly, I’d say this one’s a keeper—my kids officially ask for it whenever I’ve got fresh zucchini. The best part? It’s the kind of dessert everyone loves, and there’s no sugar crash afterward, thanks to the balanced sweetness and vegetable power inside.
How do you make a Zucchini quilt with cream cheese swirl?
Quick Overview
This zucchini quilt is seriously easy—and I mean that! You’ll start by grating your zucchini and squeezing out excess moisture, which keeps the final texture tender and not soggy. Mix up a simple batter with flour, eggs, sugar, and spices—nothing fancy here. Then, layer half the batter in your baking dish, spread a luscious cream cheese mixture on top, and top it with the rest of the batter. A quick swirl with a knife or toothpick creates beautiful patterns before you slide it into the oven. About 35-40 minutes later, you’ll have a golden, inviting cake that smells divine. Once cooled just enough to slice, you get the best combination of moist cake and creamy swirls—kind of like a breakfast cake, but also perfect as a sweet treat. In just under an hour, you’re sipping coffee and munching on something way better than store-bought stuff. Plus, it’s flexible—you can switch up the flavors or add nuts, fruits, or even a sprinkle of powdered sugar on top for presentation. It’s truly foolproof, and everyone leaves with a grin.
Ingredients
For the Main Batter:
– 2 cups grated zucchini (about 2 medium zucchinis, choose firm, shiny ones)
– 1 ½ cups all-purpose flour (or gluten-free blend, see tips below)
– 1 cup granulated sugar
– 2 large eggs
– ½ cup melted butter or neutral oil (I’ve tested this with almond milk, and it made it even creamier!)
– 1 teaspoon vanilla extract
– 1 teaspoon baking powder
– ½ teaspoon baking soda
– ½ teaspoon salt
– 1 teaspoon cinnamon (optional but lovely for added warmth)
For the Cream Cheese Swirl:
– 8 oz cream cheese, softened
– ½ cup powdered sugar
– 1 teaspoon vanilla extract
– 1 tablespoon milk or heavy cream (adjust for desired consistency)
For the Glaze (optional):
– ½ cup powdered sugar
– 1-2 teaspoons milk or lemon juice
– A splash of vanilla or lemon zest for brightness
Step-by-Step Instructions
Step 1: Preheat & Prep Pan
Heat your oven to 350°F (175°C). Lightly grease a 9×9-inch square baking dish or line it with parchment paper—trust me, this makes cleanup way easier. If you want a more rustic look, a loaf pan works just fine, too. Set everything nearby so you’re ready to roll once the batter is mixed.
Step 2: Mix Dry Ingredients
In a large bowl, whisk together your flour, baking powder, baking soda, salt, and cinnamon (if using). It’s kind of like laying a solid foundation for your cake—makes everything come together smoothly. Sifting isn’t necessary but helps if your flour has clumps.
Step 3: Mix Wet Ingredients
In a separate bowl, beat the eggs, then stir in the melted butter (or almond milk), vanilla, and sugar. Whisk until combined and smooth. I always do this step first—makes it easier to incorporate into the dry ingredients without overmixing later.
Step 4: Combine
Add the wet ingredients to the dry, folding gently with a spatula just until everything is combined—don’t overmix or your bread might turn dense. The batter will be thick but pourable. Add the grated zucchini, and fold just enough to distribute evenly. Remember, moisture is key—believe me, squeezing out excess water from zucchini before adding it keeps the texture perfect and prevents sogginess.
Step 5: Prepare Filling
Mix the softened cream cheese, powdered sugar, vanilla, and milk until smooth. It should be scoopable but not runny. I’ve found that refrigerating the mixture for 10 minutes helps it firm up slightly, making it easier to swirl.
Step 6: Layer & Swirl
Pour half the batter into your prepared dish, smoothing out evenly. Dollop the cream cheese mixture on top in spoonfuls, then pour or scoop the remaining batter over it. Using a toothpick or butter knife, swirl gently back and forth through the batter to create pretty marbled patterns—think of it as a mini art project, but edible!
Step 7: Bake
Pop it into your preheated oven and bake for 35-40 minutes. Check doneness by inserting a toothpick into the center—if it comes out clean, it’s ready. If it’s still wet, give it a few more minutes. My oven runs a little hot, so keep an eye at the 35-minute mark!
Step 8: Cool & Glaze
Let the zucchini quilt cool in the pan for about 15 minutes before transferring to a wire rack. If you’re adding glaze, whisk powdered sugar with a splash of milk or lemon juice until smooth, and drizzle over slightly warm cake. The glaze makes it extra special for serving—trust me, it’s the finishing touch that’ll make everyone swoon.
Step 9: Slice & Serve
Once cooled, slice into squares, and serve with a cup of coffee or tea. I like to sprinkle a little extra cinnamon or powdered sugar on top for presentation. It’s great warm or at room temperature—the softer the better, in my opinion.
What to Serve It With
This zucchini quilt is so versatile, it practically pairs itself. For breakfast, a cup of black coffee or chai works beautifully—nothing too sweet, just a touch of warmth to start the day. We often serve it at brunch alongside fresh fruit or yogurt; the slight tang from the cream cheese pairs wonderfully with berries or sliced peaches. When I make this as a dessert, I love presenting it with a dollop of whipped cream or a drizzle of honey—looks pretty and tastes divine. And let’s not forget a simple glass of cold milk or even a touch of vanilla ice cream for the kids. I also sometimes sprinkle chopped nuts or a handful of chocolate chips into the batter for extra crunch or decadence. This little cake is my go-to when I want something homemade, comforting, and not overly fussy. It’s perfect for weekend brunch, after-school snacks, or even a casual dinner dessert. Plus, it feels like a hug in food form—soft, sweet, and delightful.
Top Tips for Perfecting Your Zucchini Quilt with Cream Cheese Swirl
Over the years, I’ve learned a few tricks that make this recipe even better. First, always squeeze out as much moisture from the zucchini as possible—this is key to avoiding a dense, soggy cake. I usually grate the zucchini, sprinkle it with a little salt, and then press it in a clean kitchen towel or paper towels—this step isn’t optional! Moisture can sabotage the texture. When mixing the wet ingredients, don’t overdo it; just stir until everything’s combined—overmixing can lead to tough, dense baked goods, and nobody needs that. For the swirl, I like to vary the pattern—sometimes I go for a marbled look, other times I gently drag a toothpick through the batter in a zig-zag for a more rustic feel. Feel free to add cinnamon, lemon zest, or even a handful of chopped nuts or dried fruit into the batter—these little twists make it yours! My biggest lesson? Keep an eye on your oven—cakes bake faster than you think, especially if your oven runs hot. Use a toothpick to test doneness instead of relying solely on time. And if your glaze feels too thick, thin it with a few drops of milk—smooth consistency makes for the prettiest drizzle. Lastly, I’ve tried swapping out some of the sugar with honey or coconut sugar, and it’s still lovely—just watch for slightly darker color and adjust baking time if needed. Little tweaks here and there help you make this recipe truly your own masterpiece!
Storing and Reheating Tips
This zucchini quilt keeps well for a few days, which is basically a blessing when you have hungry mouths around. Store leftovers in an airtight container at room temperature for up to two days, but I recommend covering it with foil or plastic wrap to keep it moist. After that, pop it into the fridge overnight—trust me, the flavors meld even more overnight. Just make sure it’s tightly covered, or it might absorb fridge odors. If you want to keep it longer, freeze individual slices tightly wrapped in plastic or parchment, then place them in a freezer bag. It’s great to have a ready-to-go treat—you can thaw slices in the microwave or at room temp. Reheat slices gently in the microwave for about 20 seconds or in a low oven (about 325°F) wrapped in foil—to bring back that just-baked warmth and softness. If you’re adding glaze after reheating, go ahead—just drizzle a bit on warm slices to refresh the look and flavor. The texture might change slightly after freezing, but honestly, it still tastes just delightful—kind of like homemade comfort food in every bite. This recipe ages well, and the flavors actually deepen overnight—it’s no wonder I’ll often make it the night before a family gathering!
Frequently Asked Questions
Final Thoughts
This zucchini quilt with cream cheese swirl has become a staple in my kitchen. It’s the kind of recipe that warms your house, satisfies everyone’s sweet tooth, and sneaks in some veggies—what’s not to love? Every time I bake it, I get that nostalgic feeling—it’s like a cozy hug wrapped in a delicious package. I’ve tested it with so many variations, and honestly, it’s always a hit. It’s imperfectly perfect: moist, rich, with just the right touch of sweetness and tang from that cream cheese swirl. Plus, it’s forgiving—no fancy ingredients, no complicated steps—and the smell alone makes everyone gather around. I hope you try this and make it your own. Maybe add some chocolate chips, swap the zucchini for grated carrot, or sprinkle a handful of walnuts on top. No matter what, I’d love to hear how yours turns out! Happy baking, and enjoy every bite!

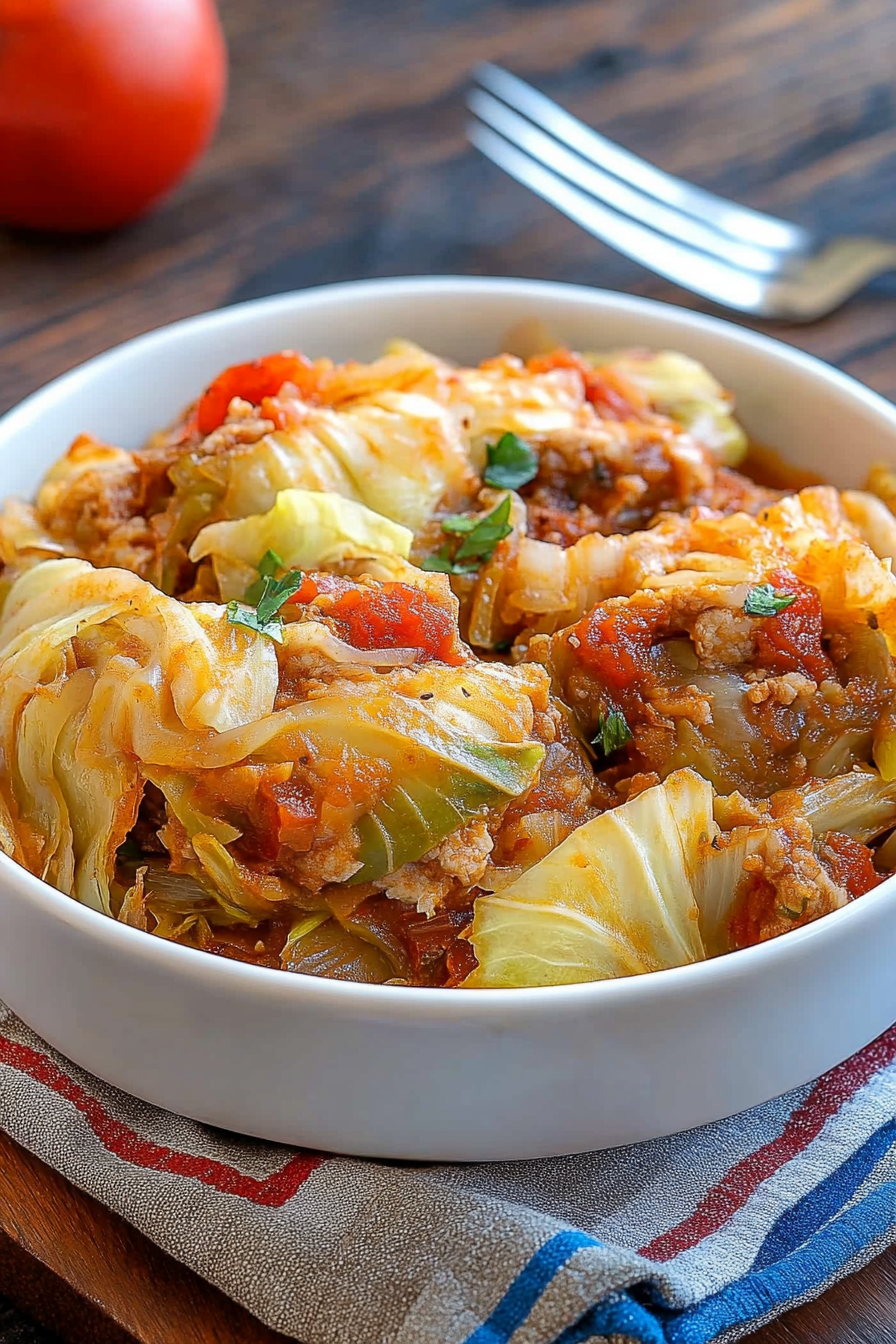
cabbage rolls
Ingredients
Method
- Preheat the oven to 350°F. Spread the cabbage across the bottom of a 9x13 inch dish. In a large skillet, cook the ground beef and chopped onion over medium heat until browned.
- Drain excess grease from the skillet. Add rice, chili powder, garlic powder, salt, and pepper to the skillet with the beef. Mix in crushed tomatoes and stir well. Spread this meat mixture evenly over the cabbage in the baking dish.
- In a small bowl, combine tomato sauce, light brown sugar, and white wine vinegar. Pour the sauce mixture over the meat and cabbage layers. Cover the dish with foil.
- Bake in the preheated oven for 90 minutes. Remove foil and let it rest for 5 to 10 minutes before serving.


Love this recipe! My garden’s overflowing with zucchini too—this is perfect for using it all. Can’t wait to try the stacked cabbage rolls.
This sounds delicious! I love using up garden veggies like this—do you have a favorite filling recipe?
I love this idea! My garden is overflowing with zucchini too, and I’m always looking for tasty new recipes. These cabbage rolls look amazing!
I totally get that! I made these cabbage rolls last summer and they were a hit—simple, fresh, and perfect when you’ve got more veggies than recipes.
I love this idea—stacked cabbage rolls look so elegant and perfect for using up extra cabbage from the garden. Definitely saving this for next summer!