
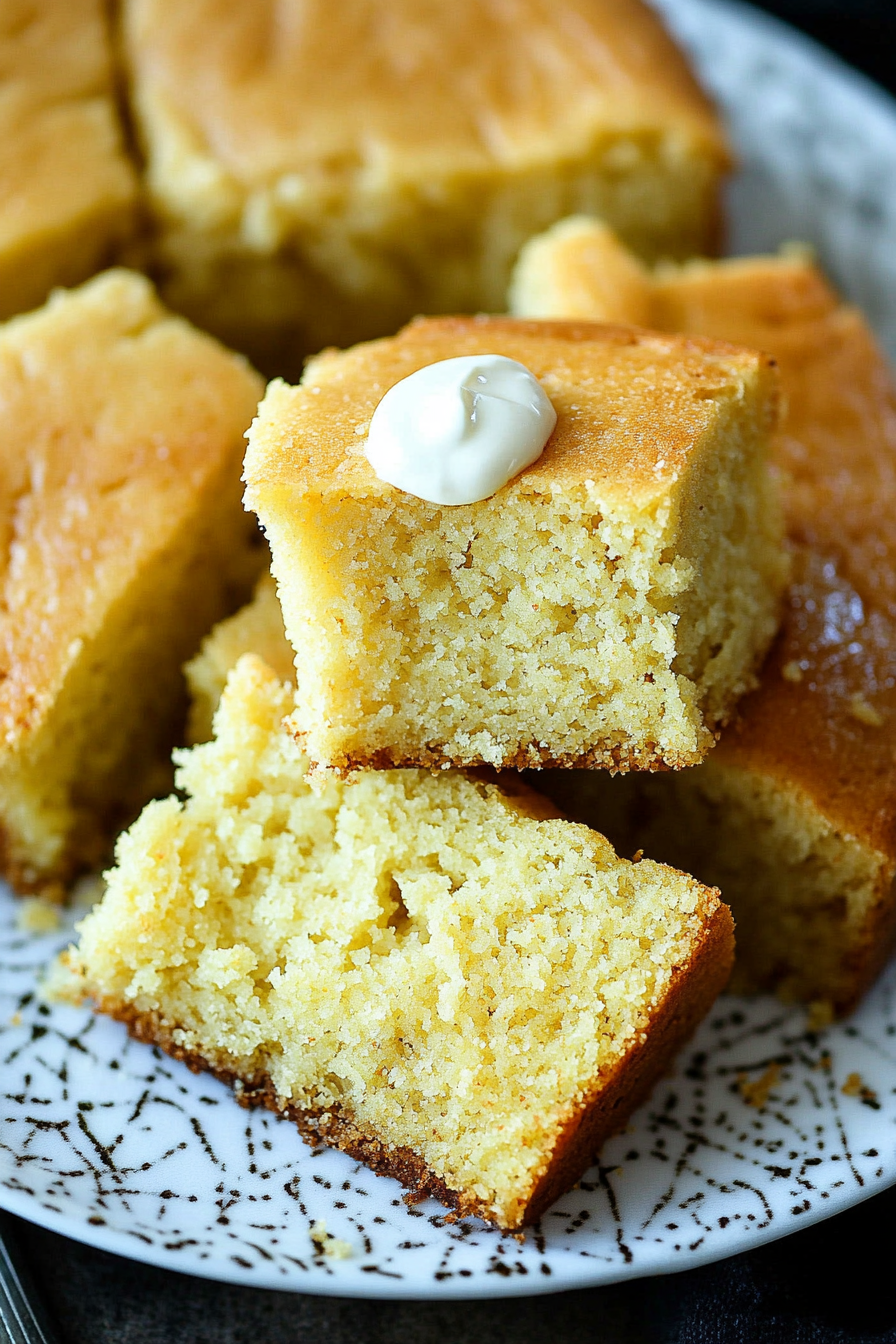
Tangy Cornbread Recipe Simple & Delicious
I remember the first time I bit into a slice of this zucchini swirl coffee cake—boy, it was like a warm hug wrapped in cinnamon and personal nostalgia. I was a kid helping my grandma in her cozy kitchen, the smell of freshly baked treats wafting through the air, making everything feel just right. Now, this recipe has become a staple in my house, especially on busy mornings when I need something that’s insanely good but also ridiculously easy. Honestly, it’s one of those recipes I keep going back to because it’s just so versatile and forgiving. My kids ask for this all the time, and I love that I can whip it up quickly without sacrificing flavor or that homey touch everyone craves. Plus, it’s a sneaky way to get some veggies into the dessert—no one ever suspects! Whether I’m serving it with coffee on a lazy Sunday or packing it into school lunchboxes, this zucchini swirl cake always disappears in minutes at my house. Trust me, once you try it, it’ll become a beloved part of your family’s sweet lineup, too.
What is Zucchini Swirl Coffee Cake?
This zucchini swirl coffee cake is like a cross between a tender, moist cake and a good-old-fashioned coffee cake—think cinnamon-spiced, slightly sweet, with swirls of grated zucchini woven through each slice. The name says it all: it’s basically a cake that celebrates zucchini (yes, that veggie!), infused with warm spices and topped with a light glaze. Think of it as a cozy breakfast treat or a snack that’s perfect for when you’re craving something sweet but still want to keep it somewhat wholesome. It’s essentially a fabulous way to use up those extra zucchinis hiding in your fridge and turn them into a showstopper. What’s kind of funny is how the zucchini almost melts into the batter, making this cake incredibly moist without making it dense or heavy. It’s like a love letter to late summer gardens, but it’s perfect for year-round baking—trust me on this one, it hits all the right notes of comfort and nostalgia.
Why you’ll love this recipe?
There’s just so much to love about this zucchini swirl coffee cake—I honestly could go on for ages. First, the flavor profile is divine. The cinnamon and brown sugar filling gives it that nostalgic coffee cake aroma, while the zucchini adds a subtle moistness and a bit of freshness that balances everything out beautifully. I always do this when I bake: I test the batter with different milks—almond milk actually made it even creamier—and it’s always a win. Second, it’s super simple to pull together. You don’t need fancy equipment or a bunch of complicated steps; just a bowl, a whisk, and some patience to wait for it to bake. This one’s a lifesaver on busy nights or when last-minute guests arrive. Third, budget-friendly ingredients—mostly pantry staples like flour, sugar, and that humble zucchini—make it affordable for almost anyone. And finally, the versatility is what seals the deal. Serve it warm with a dusting of powdered sugar, or let it cool and drizzle that lemon glaze for a more sophisticated touch. I love that this cake tastes as good at breakfast as it does as an afternoon snack or even dessert—what I love most about this is that it’s just so forgiving and adaptable. Plus, it makes the house smell incredible. Honestly, it’s become my go-to when I want something comforting but not overly heavy. And yes, my kids’ eyes light up every single time I bake it!
How do I make Zucchini Swirl Coffee Cake?
Quick Overview
This zucchini swirl coffee cake is surprisingly easy to make—literally, just mixing, layering, and baking. The trick is to prepare a moist, tender batter while whisking together a sweet cinnamon filling that gets swirled into the batter before baking. The zucchini gets grated and lightly salted to remove excess moisture, which keeps the cake light and fluffy. Once baked, you can either dust it with powdered sugar or drizzle a sweet glaze over the top. The result? A gorgeous, flavorful cake with marbled swirls that’s perfect for mornings, brunch, or an anytime treat that’s truly irresistible. I promise, once you make this a couple of times, you’ll be tweaking the filling or the glaze to suit your taste—trust me, I’ve done it all. That’s part of the fun! It’s exactly this simple process that lets the flavors shine without fussing too much, making it a real keeper in my recipe box.
Ingredients
For the Main Batter:
– 2 cups all-purpose flour (I like unbleached; it’s a little heartier)
– 1 cup granulated sugar
– 1/2 cup packed brown sugar for richness
– 1 teaspoon baking powder
– 1/2 teaspoon baking soda
– 1/2 teaspoon salt
– 1 teaspoon ground cinnamon (more if you LOVE cinnamon!)
– 1 cup vegetable oil (or melted unsalted butter for richer flavor)
– 3 large eggs
– 1 teaspoon vanilla extract
– 1 cup grated zucchini (squeeze out excess moisture with a paper towel)
For the Filling:
– 1/2 cup brown sugar
– 2 teaspoons ground cinnamon
– 1/4 cup softened butter
– Optional: Chopped nuts or dried fruit for extra texture
For the Glaze:
– 1 cup powdered sugar
– 2-3 teaspoons milk or lemon juice
– Zest of half a lemon for brightness (trust me on this, it really elevates the glaze!)
Step-by-Step Instructions
Step 1: Preheat & Prep Pan
Start by heating your oven to 350°F (175°C). Grease a 9-inch springform or baking pan—trust me, a silicone pan works wonders here—and set aside. If you like, line the bottom with parchment paper; it’s one less thing to worry about when you’re slicing later. I always do this because it keeps everything neat and fuss-free. While the oven heats, grab your grated zucchini and gently squeeze out some moisture—this step makes a big difference in avoiding a watery cake. Set aside.
Step 2: Mix Dry Ingredients
In a large mixing bowl, whisk together the flour, sugars, baking powder, baking soda, salt, and cinnamon until evenly combined. This step is crucial because it evenly distributes the leavening agents and spices—no surprises when you bite into it! Keep the bowl handy; you’ll add the wet ingredients next.
Step 3: Mix Wet Ingredients
In a separate bowl, beat the eggs with oil, vanilla, and a splash of milk or water if your batter feels too thick. When I do this, I like to make sure the eggs are at room temperature—makes everything blend smoothly. I fold in the grated zucchini last, just until combined. The zucchini’s moisture adds a wonderful tenderness, but if it’s super watery, squeeze out a bit more before mixing.
Step 4: Combine
Pour the wet into the dry and gently fold everything together until just combined—don’t overmix! Overmixing can make the cake dense, and I’ve learned this the hard way. Think of it as folding gently with a spatula, just until the streaks disappear. The batter will be quite thick, which is perfect for holding those beautiful swirls.
Step 5: Prepare Filling
In a small bowl, mix the brown sugar with cinnamon and softened butter until crumbly and fragrant. If you’re feeling fancy, toss in chopped nuts or dried cranberries. I love adding nuts—pecans or walnuts—because they add crunch and contrast. Set this aside for now.
Step 6: Layer & Swirl
Pour about half of the batter into your prepared pan, spreading it evenly. Carefully sprinkle the cinnamon sugar mixture over the top, then dollop the remaining batter on top. Using a knife or skewer, gently swirl through the layers to create those beautiful ribboned swirls. Don’t overdo it—just a few gentle passes will do. The visual pattern makes this cake extra special.
Step 7: Bake
Pop it into the oven and bake for about 40-45 minutes, or until a toothpick inserted in the center comes out clean. Ovens can vary, so start checking at 40 minutes. If the top starts to brown too quickly, tent it with foil for the last part of baking—this keeps the top from burning before the middle is cooked through. The house will smell like cinnamon and baking love.
Step 8: Cool & Glaze
Let the cake cool in the pan for about 15 minutes—this helps it set and prevents crumbling when slicing. Once cooled, whisk together your powdered sugar, milk, and lemon zest for that bright finish. Drizzle the glaze over the cake—don’t worry if it’s a little uneven; that’s part of the charm—and let it set for about 10 minutes.
Step 9: Slice & Serve
Use a sharp knife to cut neat slices, wiping it clean between cuts for the best presentation. Serve with a cup of strong coffee or tea—trust me, it’s divine. You can also top with a dollop of whipped cream or fresh berries for a little extra indulgence. This cake is best enjoyed fresh but keeps well for a couple of days wrapped in foil or stored in an airtight container.
What to Serve It With
This zucchini swirl coffee cake is pretty versatile. For breakfast, serve it with a hot cup of coffee—black or with a splash of milk—and maybe a few fresh berries or a dollop of yogurt. It’s also lovely for brunch—pair it with a mimosa or fresh squeezed orange juice, and maybe some scrambled eggs on the side. When I serve it as a dessert, I like to give it an extra drizzle of glaze and a sprinkle of chopped nuts—looks fancy but super simple. The subtle sweetness makes it a perfect ending to a cozy dinner, especially when it’s chilly outside. And honestly, my favorite way to enjoy it is as a casual snack with a cup of tea in the afternoon. It’s that kind of treat that feels like a warm hug, whether you’re celebrating or just need a pick-me-up. I’ve even packed slices into lunchboxes for my kids—they’re still surprised to find something so tasty hidden in their bag! This cake has become a staple not just because it’s delicious, but because it brings comfort, joy, and a little touch of that garden-fresh love to every bite.
Top Tips for Perfecting Your Zucchini Swirl Coffee Cake
Over the years, I’ve made this recipe countless times, learning a few tricks along the way. Here are some of my best tips:
Zucchini Prep: Always squeeze out excess moisture. I start by shredding the zucchini using the larger holes on my box grater, then lay it between paper towels to press out water. This keeps the batter from becoming too watery, which can affect the rise and texture. Freshness counts—use zucchini that’s firm and bright green, not soft or dull.
Mixing Advice: The key to a tender cake is not overmixing once you combine wet and dry ingredients. Gently fold just until combined; overmixing will lead to a denser crumb. Also, the batter should be thick enough to hold the swirl pattern—if it’s too runny, add a touch more flour.
Swirl Customization: Play with your patterns! Use a toothpick or a butter knife to create swirls in different designs—spirals, zigzags, or just random marbling. It’s a fun step that shows your personality and makes each cake unique.
Ingredient Swaps: Want to make it gluten-free? Swap all-purpose flour for a good quality oat or almond flour blend—just remember the texture will change slightly. For a dairy-free version, use coconut oil and almond milk. The cinnamon sugar filling can be jazzed up with a dash of nutmeg or cardamom for extra warmth.
Baking Tips: Keep an eye on the cake near the end—oven times can vary. Use a toothpick test to check for doneness; clean toothpick, comes out with a few moist crumbs, is perfect. Also, position your rack in the center of the oven for even heat distribution.
Glaze Variations: Feel free to switch up the flavor—try lime instead of lemon, or add a splash of vanilla extract. Use just enough liquid to make a drizzle—don’t make it too runny or it’ll slide right off the cake. Drizzle while the cake is still warm for better adherence.
From baking mistakes I’ve made (like underbaking and ending up with a gooey middle—yikes!) to the tweaks that make the flavor pop, I promise this recipe is forgiving. Just have fun with it. Remember, the best part of baking is the joy it brings—you’re creating something special, a little bit of love in every slice.
Storing and Reheating Tips
This cake tastes almost better the next day because the flavors deepen and the swirls set into that beautiful marbled pattern. To keep it fresh, store it in an airtight container or wrapped tightly with foil. If you’re not eating it all at once, I recommend refrigerating it after day one—it stays moist and fabulous for up to three days. To reheat, a quick 10-15 second blast in the microwave does the trick; you can also gently warm slices in a low oven (around 300°F) for that freshly baked feel. I usually wait to add the glaze until just before serving—if you add it too early, it might get a little soggy or runny after refrigeration. When serving, a sprinkle of chopped nuts or fresh fruit on top makes it feel extra special. Trust me, whenever I bake this, my house fills with that comforting smell, and everyone knows it’s best enjoyed warm, with a mug of coffee or tea in hand. It’s truly one of those recipes I’ve perfected over years, and I still get excited every time I make it—like coming home again.
Storing and Reheating Tips
Store leftovers in an airtight container at room temperature for up to two days, or in the refrigerator for up to three. If storing at room temp, keep it covered with foil or a cake dome so it stays moist and fresh. For longer storage, wrap slices tightly in plastic wrap and freeze—perfect for quick breakfasts or snacks later on. To reheat, microwave a slice for about 15 seconds or pop it in a low oven until warmed through. The glaze is best added fresh, but if you need to re-glaze, do so just before serving for that glossy, tempting look. If you want to skip the glaze altogether, dusting with powdered sugar also works wonderfully—simple, elegant, and just enough sweetness. My tip: freeze individual slices wrapped tightly—this way, you can grab one whenever a cozy craving strikes without thawing the whole cake. Plus, the texture remains perfect when reheated gently. This cake is one that feels like a warm hug—even days after baking, it’s still a comforting treat.
Frequently Asked Questions
Final Thoughts
If you’re on the hunt for a cake that feels like a warm hug—moist, flavorful, with just a hint of cozy spice—this zucchini swirl coffee cake is the one. It’s honestly become my family’s favorite way to celebrate those simple, quiet mornings or brighten up a dreary afternoon. The best part is how forgiving and adaptable it is; you can tweak the sugars, swap ingredients, or add your own personal touch without messing up the magic. I’ve learned from years of baking that the key to a perfect cake is loving what you make and enjoying the process—this recipe makes both so easy. I hope you try this out and find a new family favorite, too! The smell alone will bring everyone to the kitchen, and one slice is never enough. Share your thoughts or your own twists—I’d love to hear how yours turns out. Happy baking, my friends!
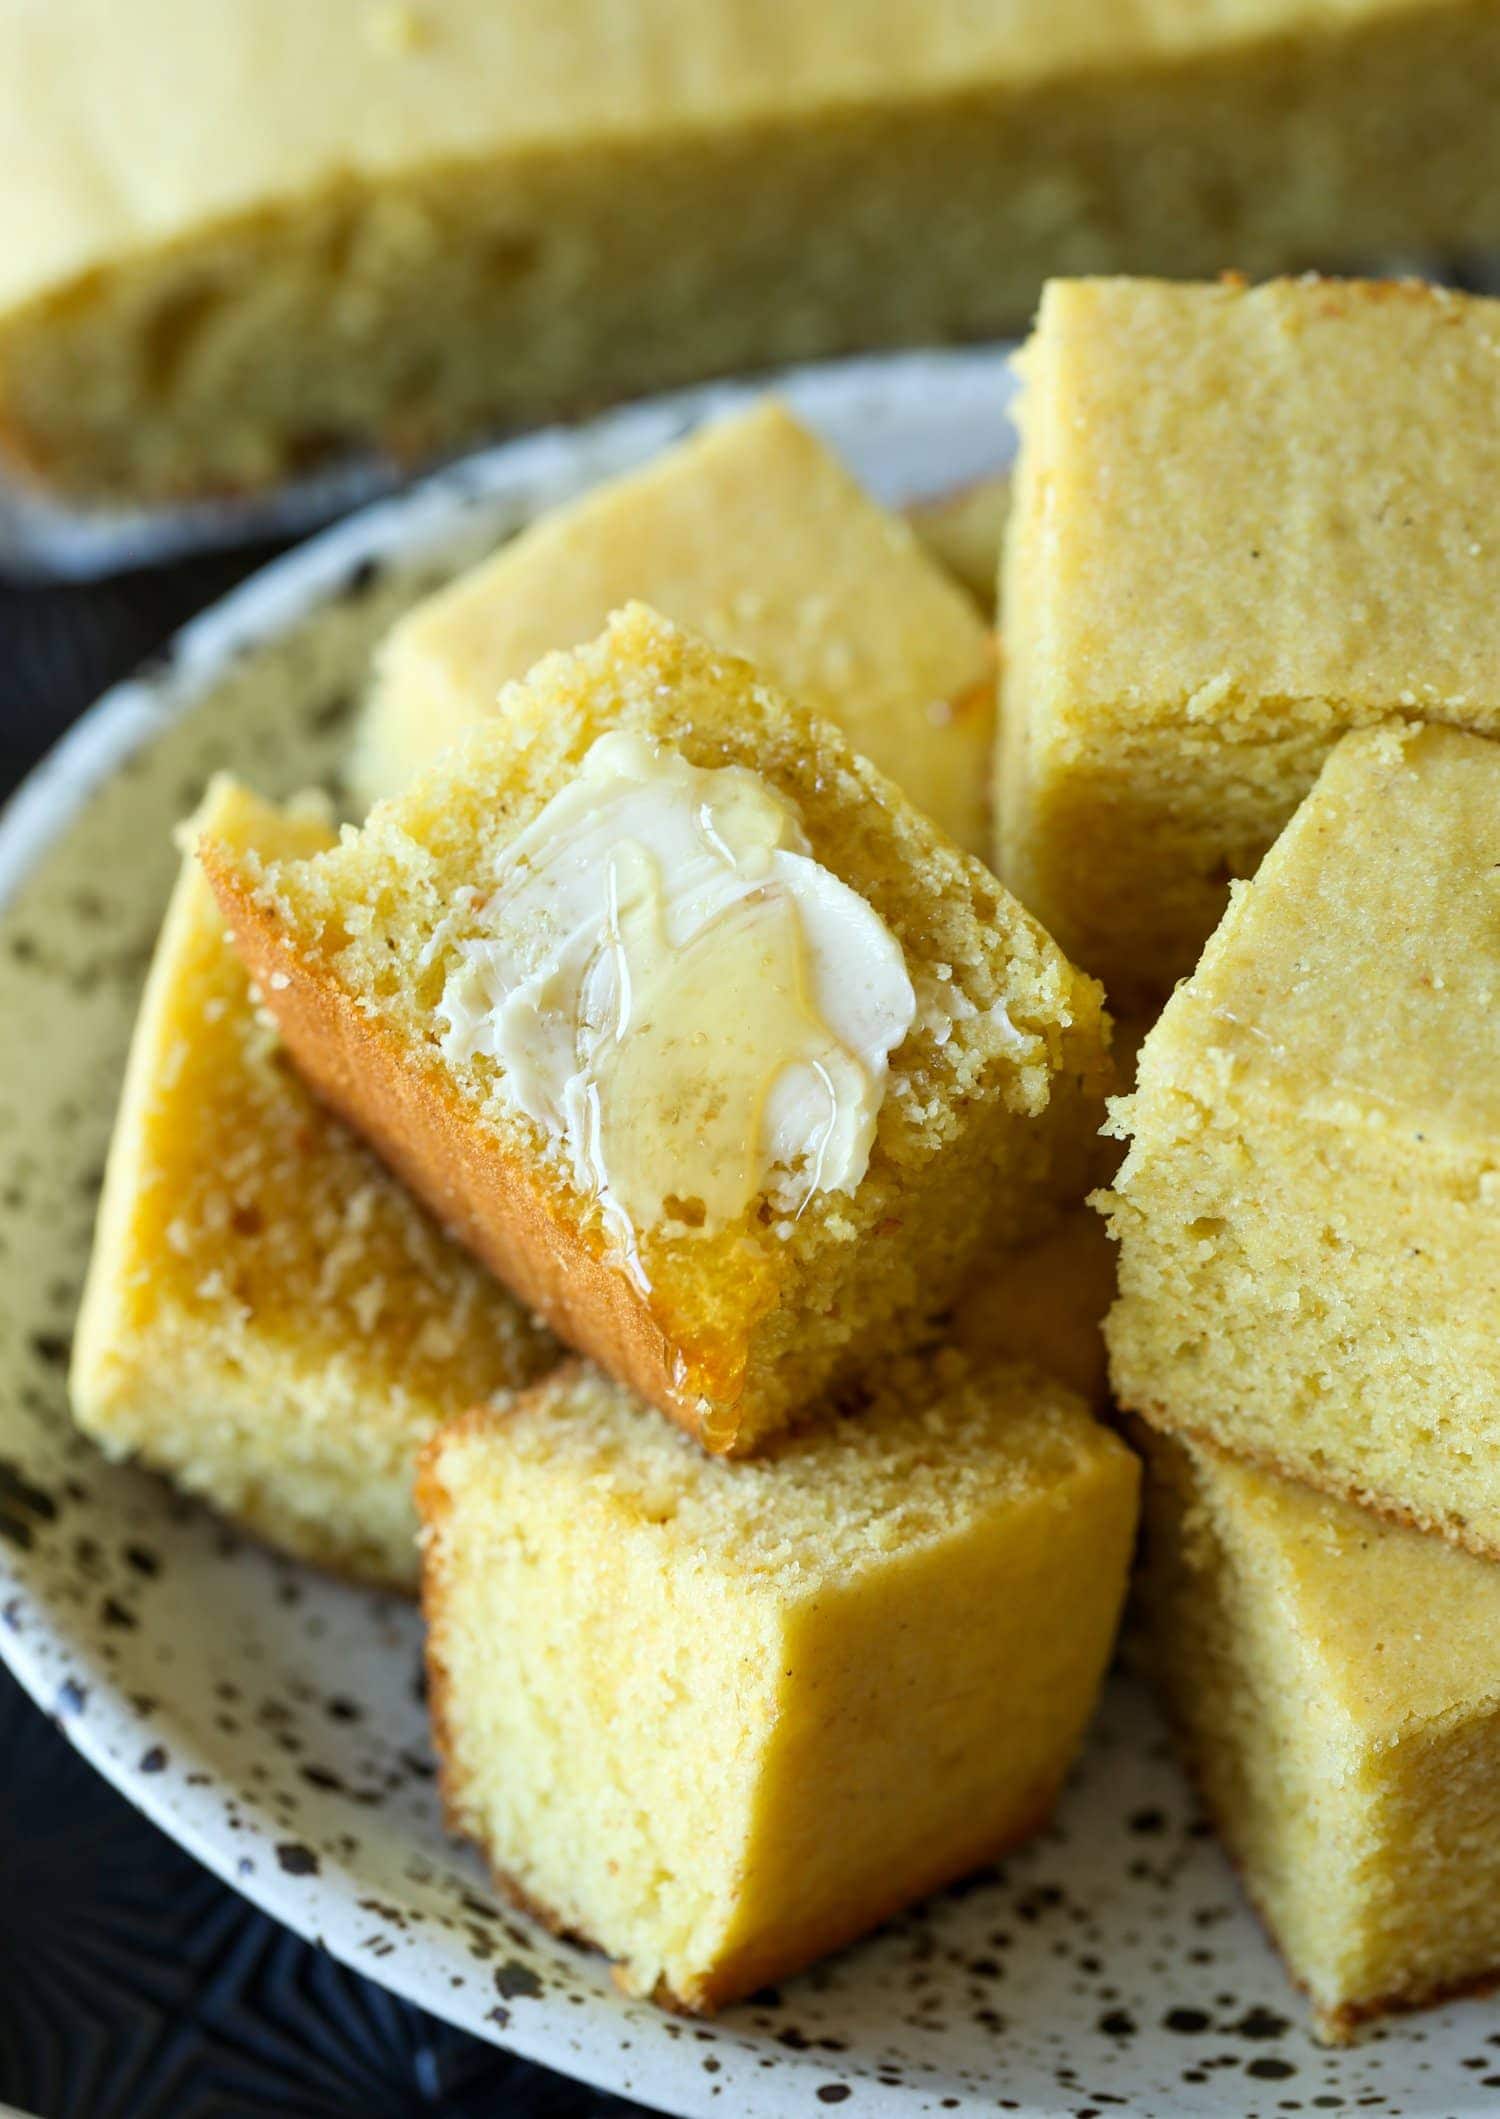
sour cream cornbread
Ingredients
Method
- Preheat oven to 375°F. Coat a 9×13-inch baking dish with cooking spray and set aside.
- In a large bowl, whisk together cornmeal, flour, sugar, baking soda, and salt until combined.
- Stir in sour cream and eggs until smooth. Gradually add in the melted butter until evenly mixed.
- Pour the batter into the prepared baking sheet and bake for 35 minutes, or until a toothpick inserted into the center comes out clean.
- Serve warm or at room temperature.


That sounds absolutely delicious—zucchini swirl coffee cake with cinnamon and nostalgia? I need to try this ASAP!
I’ve been making this cornbread all winter—it’s simple, tangy, and never fails to disappear fast. Perfect with chili or just on its own!
I love how this recipe brings back such sweet memories—simple ingredients making something truly comforting!
I love how this recipe brings back such warm, comforting memories—cornbread is perfect with so many meals!