

Wholesome Quinoa Salad for a Mediterranean Feast
I remember the first time I bit into a warm, lemony slice of this zucchini loaf. It sounds a little weird, doesn’t it? Zucchini in cake? But trust me on this — it’s one of those recipes that catches you off guard because it’s so simple, so unassuming, but then suddenly you’re hooked. I always do this when I need something cozy, something that feels like a warm hug but is still bursting with bright, fresh flavors. It’s kind of like that banana bread everyone raves about, but with a citrus twist that keeps it lively. Plus, it’s incredibly forgiving — I’ve made this countless times, swapping ingredients, and it never fails to turn out moist, flavorful, and completely addictive. My kids actually ask for this all the time, especially on lazy Sunday mornings, and I think you’ll love how easy it is to whip up during busy weeks. This one’s a lifesaver on busy nights or whenever you need a little pick-me-up without the fuss of complicated baking. Get ready to fall in love! – because once you try this zucchini lemon loaf, it’s going to be your new go-to.
What is Zucchini Lemon Loaf?
Think of zucchini lemon loaf as a cozy blend of garden-fresh zucchini and zingy lemon, baked into a tender, sweet bread. It’s essentially a citrus-infused quick bread that’s as perfect for breakfast as it is for a snack or a light dessert. The name says it all — you get that subtle, moist bite of zucchini, which adds moisture and a little nutrition, paired with the bright, sunny flavor of lemon. This bread isn’t fancy or complicated; it’s more like that trusty sweater you reach for when you want comfort with a little sparkle. It started as a way to use up extra zucchinis from my garden, but honestly, now I make it year-round because it’s just so good. It’s versatile, too — you can add poppy seeds for crunch, or a glaze if you’re feeling extra fancy. Think of it as a sneaky way to get your kids eating veggies while they indulge in something sweet and tangy. It’s simple, honest, and downright delicious — a recipe that feels like home.
Why you’ll love this recipe?
What I love most about this zucchini lemon loaf is how it manages to be both indulgent and wholesome at the same time. The flavor? Bright and zesty with a gentle sweetness that’s just perfect for any occasion. It’s like biting into sunshine, and I swear, the smell alone brings everyone to the kitchen — I’ve had friends ask if I’ve baked a lemon orchard! And speaking of easy, this recipe is a total breeze. No fancy equipment needed — just a bowl, a spoon, and your oven. Plus, it’s budget-friendly; the ingredients are pantry staples you probably already have lying around. I’ve tested this with almond milk, and it actually made it even creamier — trust me on that! This bread is super versatile too: serve it toasted with a smear of butter, or dollop on some yogurt for breakfast, or just plain with a cup of tea. It’s perfect when you’re craving something sweet at 10 pm but don’t wanna turn on the oven for a whole batch of cookies. Honestly, what I love most is how adaptable it is — you can tweak it to make it your own, and it still turns out spectacular every time.
How do I make Zucchini Lemon Loaf?
Quick Overview
This zucchini lemon loaf comes together in under an hour, making it perfect for those days when you want a satisfying treat without a trip to the bakery. The process is straightforward — mix your dry ingredients in one bowl, your wet ingredients in another, then gently fold them together. The zucchini, grated finely and partially drained, adds moisture without overwhelming the texture. A quick swirl of batter with fresh lemon zest and juice is all it takes to get that fresh citrus flavor shining through. Pour the batter into a loaf pan, sprinkle with seeds or sugar if you like, and bake until golden. The smell alone will make your kitchen smell like a spring garden. It’s a foolproof recipe that’s forgiving, so don’t worry if your batter looks a little lumpy or if your pan gets a little messy — it’ll still turn out delicious!
Ingredients
For the Main Batter:
– 2 cups all-purpose flour (or gluten-free blend, see tips below)
– 1 teaspoon baking powder
– ½ teaspoon baking soda
– ¼ teaspoon salt
– ½ cup sugar (up for more sweetness, or honey/maple syrup for natural sweetness)
– ½ cup vegetable oil or melted butter
– 3 large eggs
– 1 teaspoon vanilla extract
– 1 cup finely grated zucchini (about 1 small zucchini)
– 1 tablespoon lemon zest (from about 1 large lemon)
– ¼ cup fresh lemon juice
For the Filling (Optional):
– ¼ cup chopped nuts or seeds (poppy, sunflower, or walnuts)
– 2 tablespoons sugar or sanding sugar for sprinkling
– A handful of fresh herbs like basil or mint for a flavor twist
For the Glaze:
– ½ cup powdered sugar
– 1-2 tablespoons lemon juice
– Lemon zest for garnish
Step-by-Step Instructions
Step 1: Preheat & Prep Pan
Set your oven to 350°F (175°C) and grease a standard loaf pan with butter or line it with parchment paper. Having your pan ready means you can pop it straight into the oven when your batter’s ready — no last-minute scrambling. I often sprinkle a little sugar or seeds on top before baking for a little crunch and sparkle. Also, grate your zucchini first, then gently press out excess moisture with a paper towel or clean cloth. This trick keeps your bread from being too wet and helps it bake evenly.
Step 2: Mix Dry Ingredients
In a large bowl, whisk together the flour, baking powder, baking soda, salt, and sugar. Sifting isn’t necessary, but it helps avoid clumps — plus, it aerates the mixture, giving you a lighter loaf. I always do this first to get the dry ingredients nice and combined, so the baking soda and powder distribute evenly. Good mixing here sets a solid foundation for a tender crumb.
Step 3: Mix Wet Ingredients
In another bowl, whisk together the eggs, oil, vanilla, lemon zest, and lemon juice. If I’m feeling adventurous, I sometimes swap half the oil for Greek yogurt or apple sauce — both add moisture and keep the loaf super soft. Mix until you see the ingredients fully combined and a bit frothy — that’s your sign they’re ready to go.
Step 4: Combine
Pour the wet ingredients into the dry, and fold gently with a spatula or wooden spoon. The key here is not to overmix — a few lumps are okay! Overmixing can develop gluten and make your bread dense. Just gently combine until everything looks combined but not smooth like batter for pancakes. Remember, a little rustic-looking batter is perfect for a moist, tender loaf.
Step 5: Prepare Filling
If you’re adding nuts or seeds, fold them into the batter now. You can also sprinkle some on top before baking for that Instagram-worthy finish. I love sprinkling a little sugar or sanding sugar on top for a subtle crunch and extra sweetness. For herbs or extras, fold them in at this stage or layer with the batter in the pan.
Step 6: Layer & Swirl
Pour half the batter into the pan, then add a spoonful of the lemon curd or extra lemon zest for a burst of flavor. Swirl gently with a toothpick or skewer — don’t overdo it, just enough to create marbling. Add the remaining batter and swirl again if you want that beautiful, artsy look. It’s these little details that make every slice just a little more special, don’t you think?
Step 7: Bake
Pop it into the oven and bake for about 50-55 minutes. Every oven is different, so start checking around the 50-minute mark. Look for a golden top and a toothpick inserted into the center that comes out clean. If it browns too quickly, tent with foil to prevent burning — I’ve learned to do that after a few over-golden loaves! Patience is key here, but the smell alone will have everyone waiting by the oven.
Step 8: Cool & Glaze
Let the loaf cool in the pan for 15 minutes before transferring it to a wire rack. The first few minutes are tricky — it’s tempting to cut into it right away, but cooling helps everything set up nicely. Mix your powdered sugar and lemon juice to make a simple glaze, and drizzle generously once the bread has cooled slightly. Pouring the glaze while the loaf is still warm ensures it seeps into every crevice, creating that shiny, irresistible finish.
Step 9: Slice & Serve
Use a serrated knife for clean slices. I like to wait until it’s just barely cool — warm enough that the glaze is still gooey, but not hot — so the slices hold together beautifully. Serve it as is, or with a dollop of whipped cream or Greek yogurt. It’s perfect for breakfast with a cup of tea or for an afternoon snack with iced coffee. Honestly, it’s such a versatile treat that everyone in my family asks for it on repeat. I swear, you’re going to love how easy and delicious this turns out every single time.
What to Serve It With
This zucchini lemon loaf is like that versatile little black dress — it fits every occasion! For breakfast, I love slicing it thin and pairing it with a strong Americano — the citrus cuts through the bitterness beautifully. It’s also fantastic for brunch — serve warm with whipped butter and fresh berries, or alongside a big ol’ pot of coffee and maybe some scrambled eggs. When I serve it as dessert, I like to dress it up with a dusting of powdered sugar or a drizzle of honey, paired with a glass of chilled Prosecco or a cup of herbal tea. It’s honestly a crowd-pleaser whether I bake it for family or bring it to friends — the flavors are so fresh and comforting. As a casual snack, I just slice a piece and keep it on the counter — it disappears so fast, I’ve learned to bake extra!
Top Tips for Perfecting Your Zucchini Lemon Loaf
Over the years, I’ve picked up a few tips that make my loaf turn out just right every time. First, prep your zucchini properly — I always grate it finely and squeeze out as much moisture as I can, so the bread stays moist but not soggy. If your zucchini is watery, the loaf can sink or turn dense, so don’t skip this step! When mixing the batter, resist the urge to overdo it — a gentle fold is all you need. Overmixing can squeeze out air bubbles, making your loaf heavy. For swirling, I like to add a few extra lemon zest spoonfuls in certain layers to get bursts of citrus flavor with each bite. You can swap out the lemon for orange if you’re feeling fruity, or add poppy seeds for texture. One thing I tested and loved was using almond flour for a richer, nutty flavor; just reduce the flour slightly and add a bit more liquid to balance. Baking times can vary depending on your oven, so keep an eye on it and test doneness with a toothpick — it should come out just clean. And don’t forget to glaze! A lemon glaze adds a shiny, tangy finish that makes this loaf irresistible. Keep experimenting — that’s how you learn what makes your perfect loaf.
Storing and Reheating Tips
This loaf stays fresh surprisingly well, which is a tiny miracle in my busy house. At room temperature, wrapped tightly in plastic wrap or stored in an airtight container, it stays soft and moist for up to 2 days. After that, I prefer refrigerating it; just make sure it’s well-covered so it won’t dry out. It’s still delicious — just a little firmer — and I usually reheat slices in the microwave for about 10-15 seconds if I want that just-baked warmth. If you want to keep it longer, freezing is a good option. Wrap the loaf tightly in plastic wrap, then foil, and it’ll stay perfect for up to 3 months. When you’re ready to enjoy, thaw overnight in the fridge or warm slices gently in the microwave. If you’ve added glaze, wait until the bread is thawed and warmed before drizzling again to keep that shiny finish. Honestly, this loaf holds up well, and the flavors even deepen overnight — it’s like a fine wine of baking!
Frequently Asked Questions
Final Thoughts
This zucchini lemon loaf has become one of those recipes I turn to more than I’d like to admit, mainly because it’s so reliably good and endlessly adaptable. Whether I’m craving something bright and fresh or just need a comforting, moist slice to get me through the afternoon, it never disappoints. And truthfully, it’s a sneaky way to get your family — especially kids — to eat their veggies without protests. I’ve experimented with different flavor twists, added some blueberries or swapped the lemon for orange zest, and each version turns out just as comforting as ever. I hope you give it a try — I think it’ll become a beloved staple in your kitchen, too. Happy baking! And I can’t wait to hear how yours turns out. Leave a comment, share your own tweaks, or just tell me how you enjoyed it with a cup of tea. Either way, enjoy every delicious bite!
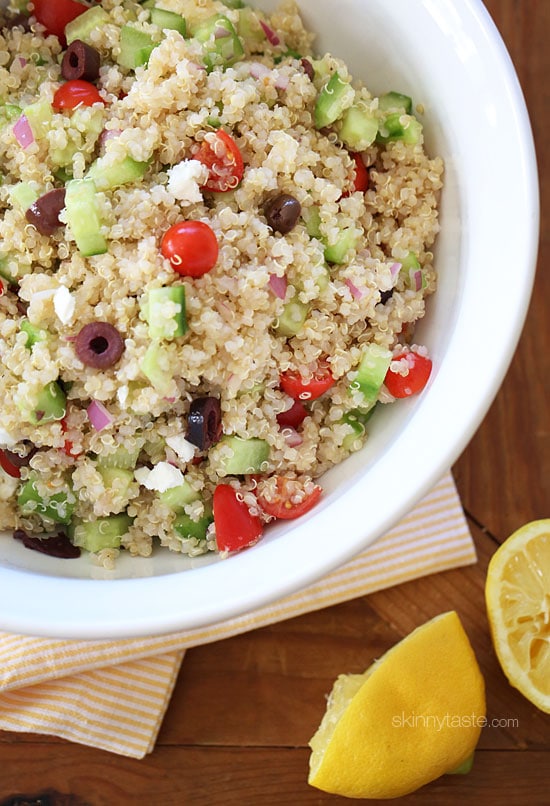
quinoa salad
Ingredients
Method
- Rinse the quinoa for about 2 minutes, using your hands to remove any saponins.
- Cook the quinoa: fill a medium pot with water, add quinoa and salt to taste, bring to a boil. Reduce heat to low, cover, and simmer for 15 minutes.
- Remove from heat and keep covered for 5 minutes. Fluff with a fork and transfer to a large bowl to cool.
- Dice all vegetables while quinoa cools.
- Add diced red onion, olives, cucumber, and cherry tomatoes to the cooled quinoa. Squeeze half a lemon over the mixture.
- Drizzle olive oil over the mixture. Add feta cheese, salt, and pepper. Toss well to combine.
- Taste and adjust seasoning or lemon juice as needed before serving.


This quinoa salad sounds amazing—healthy and full of Mediterranean flavors! I’m definitely trying this recipe.
Love the idea of zucchini in cake—it adds so much moisture and subtle flavor! I’ve tried it before and it turned out surprisingly delicious.
Love how this recipe combines fresh flavors—zucchini in cake is such a game-changer! Can’t wait to try the Mediterranean quinoa salad too.